https://www.marksymondsroofing.com/blogs/import-blog-tonic.atom marksymondsroofing - Blog Tonic 2024-02-27T11:11:23+00:00 marksymondsroofing https://www.marksymondsroofing.com/blogs/import-blog-tonic/sweet-cart-craft-project 2024-01-25T15:55:24+00:00 2024-04-16T17:02:00+01:00 Craft a Vintage Sweet Cart | Perfect For Wedding Favours & Centrepiece's Shopify API

This beautiful die set makes fabulous Sweet Carts which can be used as table centres for weddings, parties or as gift boxes.

You’ll need the following

- Scrumptious Sweet Cart Showcase die set

- Craft Perfect 300gsm Smooth Bright White Card

- Craft Perfect 216gsm Classic Card, Chilli Red, Ballet Pink, Pistachio Green

- Nuvo Deluxe Adhesive

- Craft Perfect 3mm Chilli Red Ribbon

- 2 small brads/split pins


Step 1

1. Die cut all of the pieces shown at the top of the instruction sheet in your die set.

Score and fold both Sweet Cart Bases as shown. Set one base aside.


Step 2

2. Glue along the long glue tab to attach the base together.

Step 3

3. Die cut 4 Canopy Posts and trim 2 at the debossed lines. Burnish the score lines and fold in, gluing one long tab on each and creating tubes.

Step 4

4. Feed the 2 longer canopy posts through the square tab apertures at the front of the cart until the small score line is level with the bottom of the card. Adhere the glue tabs to the posts.

Step 5

5. Feed the 2 shorter posts through the remaining top face square tab apertures until they line up with the bottom of the box. Adhere the sides of the posts to the inner box and attach the side glue tabs to the posts.

Step 6

6. Match up 2 sets of decorative handle die cuts so that they will fit together back to back. Remove the glue tabs from the back one of each set and glue each pair together as in the top right of the photo. 

Step 7

7. Fold and glue the tabs to the cart as shown. Repeat on the other side of the cart.

Step 8

8. Die cut the Open Me aperture into one of the side panels.

Step 9

9. Glue the Open Me panel to the rear of the cart.

Step 10

10. Glue the plain panel to the front.

Step 11

11. Burnish the score lines on the canopy front and side panels.

Step 12

12. Adhere the 2 canopy die cuts together by the glue tabs in the centre. 

Step 13

13. Attach the canopy side panels in place and then create 2 panels using both dies shown to decorate the canopy. Glue these in place on each side of the canopy.

Step 14

14. Glue the Canopy Front and Side decorative strips in place and add dots of glue into the inside corners of the canopy.

Step 15

15. Attach the canopy posts to the dots of glue to hold the canopy in place.

Step 16

16. Take the 4 wheel holder die cuts and glue together in pairs. 

Step 17

17. Glue the wheel holders in place with the little score lines level with the base of the cart, on both sides.

Step 18

18. Trim away the side panels from the remaining Sweet Cart Base die cuts. Glue these to each side of the cart to cover the wheel holders. 

Step 19

19. Take the 10 wheel die cuts and glue 5 together to create one wheel. Repeat. Attach one wheel to each wheel holder with a brad/ split pin.

Step 20

20. Use the dies shown to create the decorative side panels and adhere one to each side of the cart.

Step 21

21. Fold the little decorative tabs in half and glue to the opening panel as shown. 

Step 22

22. You can keep this panel closed with a knot/bow of ribbon.

Step 23

23. Decorate the cart with die cut bunting and flowers.

Step 24

24. Add die cut balloons to the back of the cart.

You can see how I made a second Sweet Cart in my video

Buy The Craft Project

]]>
https://www.marksymondsroofing.com/blogs/import-blog-tonic/sweet-cart-wedding-card 2024-01-25T15:55:22+00:00 2024-04-16T17:02:27+01:00 Craft a Beautiful Sweet Cart Wedding Card With Shilpa Saleh Shopify API

Hi its Shilpa here and I’m here to share with you all a beautiful wedding card using the Sweet Cart Die Set. I love the versatility of this die set. It creates the most gorgeous 3D carts and with the same elements you can make cards that are just as pretty. (You can see my 3D cart makes over on my YouTube channel @craftangelonline)

Hope you craft along with me to create the card.

Crafty hugs

Shilpa xxx

You’ll need the following

- Scrumptious Sweet Cart Showcase die set

- Craft Perfect 300gsm Smooth Ivory White Card

- Craft Perfect 250gsm Pearlescent Card, Ivory Sheen, Gleaming Lilac, Blue Frost

- Craft Perfect 250gsm Mirror Card, Venetian Gold

- Craft Perfect 100gsm Vellum Paper, Pearled Silver

- Craft Perfect, Dimensional Foam Pads, 12mm x 12mm

- 1418e Miniature Moments, Wedding Day Die Set

- 4447e Simple Florals, Pretty Pansy Die Set

- Nuvo Pure Sheen, Iridescent Circles

- Nuvo Deluxe Adhesive

- Fine Tip Precision Hot Glue Gun

- Precision Glide Folder

- Floral Crafters Tool Set


Step 1

Start by cutting all the elements to create the cart for the card. First cut the large, main base die once. I have used the Gleaming Lilac Pearlescent Card. Then with your scissors cut away the sections you see in the photo.

Step 2

Now using the die that cuts out the scored piece, cut it once using Ivory White Smooth Card and trim along the scored lines using your trimmer or scissors as shown below.

Step 3

Now cut the following pieces (these will create the decorative side of the cart). Use the following coloured cards. Blue Frost Pearlescent Card, Gleaming Lilac Pearlescent Card, Ivory White Smooth Card and for the little bow, Venetian Gold Mirror Card.

Step 4

At this point continue to cut more elements for your cart as shown below. This will be for the top of the cart. Use the following cards, Blue Frost Pearlescent Card, Gleaming Lilac Pearlescent Card and Ivory White Smooth Card.

Step 5

Now cut the following pieces using Ivory White Smooth Card and Venetian Gold Mirror Card.

Step 6

Cut Wedding Day sentiment using Ivory White Smooth Card and Venetian Gold Mirror Card. You will stick them together to create a gold shadow using Nuvo Deluxe Adhesive.

Step 7

Create some dainty flower embellishments using the little flower dies from this die set and also using Simple Florals Pretty Pansy Die Set. Use Pearled Silver Vellum Paper for large flowers and Ivory White Card for small ones. You can also use the Tonic Floral Crafters Tool to add dimension to your flowers. Add a Nuvo Pure Sheen Iridescent Circle to the centre of each flower.

Step 8

You can now start to assemble some elements before adhering to the card front. Use Nuvo Deluxe Glue to stick the following pieces together. Then add 12mm x 12mm Craft Perfect Foam Pads behind the full thing (cut some down to put behind the handle area).

Step 9

You can now assemble the following section using a combination of Nuvo Deluxe Adhesive and 12mmx12mm Craft Perfect Foam Pads.

Then place this on to your card base. Card base here is an A4 piece of Ivory Sheen 250gm Pearl Card scored to create A5 card blank.

Tip – an A4 sheet card scored, makes the perfect A5 size card for the full cart to fit on.

Step 10

You can add the assembled cart roof of top using doubled up 12mm x 12mm Craft Perfect Foam Pads to give extra dimension.

Tip – add a little curve to the roof using your Tonic Precision Glide Folder for a domed effect


Step 11

Now time to add the decorative elements using Nuvo Deluxe Adhesive and 12mmx12mm Craft Perfect Foam Pads behind the balloons.

Step 12

Final touch is to add the flowers created earlier using hot glue and Fine-Tip Precision Hot Glue Gun. Add an insert on the inside of the card using Classic Cream Card trimmed down to few millimeters smaller than A5, use Nuvo Deluxe Adhesive to stick it.

Tip – lay the flowers on top of your cart, take a photo on your phone to remember where you want to stick them.


You can see how I made my co-ordinating Wedding Themed Sweet Carts in my video

Buy The Craft Project

]]>
https://www.marksymondsroofing.com/blogs/import-blog-tonic/thankful-harvest-box-tutorial 2023-07-13T16:00:00+01:00 2024-04-16T16:57:09+01:00 How to craft & assemble the Thankful Harvest Box Die Set Shopify API

What you will need

- Thankful Harvest Box Die Set

- Ivory Smooth Card

- Smooth Mint Mirror Card

- Deluxe Adhesive

Step 1

Die cut 2 of the large box shape from your base colour and burnish all the score lines.

Step 2

Use the 2 dies shown to cut out 2 decorative panels. Glue these onto the corresponding shapes on the box.

Step 3

Use the 2 dies shown to cut out the decorative rectangles and glue in place.

Step 4

Die cut the decorative panels for the dies of the pockets and the top of the box with the dies shown and glue in place.

Step 5

Fold inwards, glue the tab and along the bottom and fold the other side over to create a pocket.

Step 6

Turn one panel at 180 degrees to the other and glue together by the central tabs as shown.

Step 7

It should then look like this. 

Step 8

Glue the small tabs on each side of the next panel to the corresponding sides on the box front and back.

Step 9

Use the outline shape shown to die cut one plain shape then tape the slit die into place using the notches as guides to create a panel with a slit.  

Step 10

Use both dies shown to create 2 patterned panels and glue these onto the plain shapes, making sure to line up the slit on one of them.

Step 11

Die cut a strap and fold.

Step 12

Attach a small magnet to the underside of the circle.

Step 13

Glue the panel with the slit onto one side of the box. Tuck the short end of the strap into the slit and glue in place.

Step 14

Place another magnet on top of the one already glued and add the adhesive circle on top. Then fold over the strap and press into place on the side of the box.

Step 15

Glue the second side panel (without the slit) on top, covering the magnet.

Step 16

Now the strap will close over and be held in place with the magnets.

Step 17

Die cut the tag. And leaves and attach to the top of the box with ribbon. Then make a card for the inside using the plain die shown for the ivory part and using both dies shown for the green die cut. Glue both together.

Finished

]]>
https://www.marksymondsroofing.com/blogs/import-blog-tonic/untitled-jun-14-12-37-15 2023-06-15T16:00:03+01:00 2024-04-16T16:56:25+01:00 Untitled - Jun 14, 12:37:15 Shopify API

The Terrific Triple Towers Showcase is a such a versatile die set which enables you to create 3 initial towers, the Windmill, the Lighthouse and the Helter Skelter, however there are plenty more towers/structures you can create with this set, just get your imagination going and the list will be endless :D The towers are straightforward to assemble, but for a helping hand, here’s a photographic step by step on how I constructed my Windmill.

Step 1

Die-cut 6 of the larger sides and 2 bases from your base colour. Pre fold all the scored glue tabs.

Step 2

Adhere one piece to each side of the first hexagon base piece as shown.

Step 3

Flip over, and add the second base, to really hold those bottom glue tabs in place.

Step 4

Die-cut and layer up your decoration for the bottom layer, and adhere them onto the sides.

Step 5

Use the long side glue tabs to build the base.

Step 6

Then move onto the tiny glue tabs at the top…

Step 7

Tiny pegs are very helpful to hold these in place as they dry.

Step 8

Die-cut 6 of the side pieces for the top of the box...

Step 9

Decide on your decoration, die-cut and layer as before…

Step 10

Glue all of your side panels together with the long glue tabs as shown, then add to your decoration too. 

Step 11

Finally glue the last side.

Step 12

Repeat the process from steps 6 and 7 for the top and bottom tiny tabs of this top section of the windmill body. 

Step 13

For the top of the windmill, cut 3 of each of the 2 pieces depicted above. 

Step 14

Glue the 3 with the hexagonal piece together like so… 

Step 15

Then use the remaining glue tabs to form it into this shape…

Step 16

…It looks like this from the other side.

Step 17

For the next section down of the top lid piece, you’ll need to glue together the other 3 pieces shown in Step 13 together like shown.

Step 18

And once you adhere that final side, I'll look like thisLeave these 2 pieces to dry while we make the sails.

Step 19

I wanted to have vellum in my sails, so I cut 8 of the sail pieces, 2 for each of the sails, plus a piece a gold pearl vellum per sail too.

Step 20

Adhere one sail to the vellum, then trim off the excess.

Step 21

Flip it over and stick the other sale to the back, just to make them nice and sturdy.

Step 22

Repeat this for all 4 sails.

Step 23

Begin attaching the sails together, we want them to all be at 90 degrees to each other, the grid lines on your glass mat help tremendously with this.

Step 24

Add the last sail and leave to dry...

Step 25

To hold the sails onto the windmill, we need 2 of these die set, pre fold all the score lines for easier assembly...

Step 26

... Then add glue to the tiny triangular glue tabs...

Step 27

And bring the pieces together like so.

Step 28

You can now use a brad to attach the sails to this black piece...

Step 29

... Opening up the legs of the brad inside like so to secure them into place, then should still be able to spin...

Step 30

Back to the lid portion, add some red liner tape to those top curved tabs...

Step 31

... Then add to top piece like so.

Step 32

Finally you can add the sails, using the 2 remaining glue tabs on that black hexagonal 3D piece.

Step 33

Finally we need a nice neat base, so die-cut 2 of these pieces, and pre fold all the score lines...

Step 34

... Twist the 2 pieces round and adhere together like so...

Step 35

... Then use the tiny triangular glue tabs to bring up the sides...

Step 36

... Add glue to this section, and tuck it under so it sticks to the base ...

Step 37

... So you end up with a piece like this once all the pieces are tucked under.

Step 38

Add some glue into the centre, and place the base inside.

Step 39

Now you can decide where you want to adhere the piece, you can make the whole bottom piece whole, as shown...

Step 40

... Or you can stick the lid to the top half and have the box opening in the centre ...

Step 41

Youve also got plenty of extra dies to add windows and doors to the windmill too :D

Buy The Craft Project

]]>
https://www.marksymondsroofing.com/blogs/import-blog-tonic/superb-slider-box-step-by-step 2022-10-13T16:00:01+01:00 2024-04-16T16:49:14+01:00 A step by step guide on how to craft the Superb Slider Box With Shabneez Khan-Muztar Shopify API

What you will need

- Showcase Superb Slider Box Die Set

- Ice Rink Specialty Card

- Grass Green Classic Card

- Craft Perfect Woodland Walk Paper Pad

- Craft Perfect Autumn Maple Paper Pad

- Fresh Mint Pearlescent Card

- Tangerine Die Cutting Machine

- Nuvo Deluxe Adhesive

- Paper Trimmer

- Scissors

Step 1 - Making the Base 

Die cut the pieces below from green card. Join the 2 long pieces together and prise all the tabs down with your fingers.

Add glue to the 5 tabs at a time and stick them to one of the large circles you have die cut. Make sure you press and hold until they are firmly stuck before you glue the next set of 5 tabs. Continue until you have formed the circle. Add glue to all the top tabs and stick the second large green circle on the top. Press firmly.

Step 2 - Creating the Slider Box Cover 

Die cut 2 of the Outer Cylinders from white card. Stick together by adding glue along the tab. Cut a sheet of 6”x6” green printed paper in half and stick in the centre across the white cylinder base then trim off the excess on either side.

Die cut 2 of the medium sized green circles with the slit die on the top. I used washi tape to secure the slit die in between the guides. Die cut 2 of the semi circles with a design of your choice in white card and stick on to one of the green circles with glue.

Step 3

Prise down all the tabs on the outer cylinder, curve it and add glue to 5 tabs. Stick those 5 tabs down on to one of the green slit circles and hold until secure then do the same again until you have made the circle. Add glue to the side tab and stick to secure your cylinder.

Add glue to the top and stick the decorated circle on top with glue. I have decorated the cylinder using a tag from this set and a sunflower die cut from the Stamp Club Sunshine & Sunflowers set.

Step 4 – Creating the Drawer Compartments

To make one compartment, die cut 2 of the dies below in green card. Stick one die cut onto the other as shown in the first photo. Burnish the folds and add glue to 4 of the tabs and stick the top and bottom down.

Die cut 2 semi circles from green card and stick one above and one below the compartment carefully curving the side tabs before sticking down with glue. Repeat this step 2 more times so you have 3 compartments in total.

Step 5 – Creating the Drawers

Die cut the pieces shown below from light green card and the decorative element from white card then adhere with glue as shown.

Take the base and stick the back and then the sides. Curve the front panel and adhere the panel to the front with glue. Repeat this step so you have 3 drawers in total.

Step 6 – Assembling the Superb Slider Box

Die cut the elements below from white card. Curve the storage panel before adding glue to the hinges and adhering to both sides. Use the hinges to secure the storage panel to the central support die cut from green card with glue. Stick a die cut handle from light green card to the top and adhere the compartment on to a die cut mid size circle from green card.

Step 7

Stick the 3 compartments on top of each other with glue.

Die cut another compartment support die from green card and another handle from light green card. Put glue on the back of the compartment base and slide the compartment support piece through the tabs. Add glue to the tabs and stick down. Stick the handle on the top with glue. To finish, add glue to the back of both the compartments, the handle and the bottom and stick on to the circle base then press together to secure.

Use Shabneez's guide to create a variety of gorgeous Superb Slider Boxes

Crafting Essentials

]]>
https://www.marksymondsroofing.com/blogs/import-blog-tonic/superb-slider-box-tutorial 2022-10-13T16:00:01+01:00 2022-10-13T16:00:03+01:00 How to craft & assemble the Superb Slider Box Showcase With Ruth Hamilton Shopify API

The beautiful Superb Slider Showcase die set has 43 different dies which can be used in several combinations to make pockets, shelves and drawers which fit together and are enclosed in a removable cylinder.

What you will need

- Showcase “Superb Slider Box” die set

- Tangerine A4 die cutting machine

- Craft Perfect Ivory 300gsm Smooth Card

- Craft Perfect Classic Card – Ivory White

- Craft Perfect Satin Effect Mirror Card - Baroque Rose

- Nuvo Deluxe Adhesive

- Patterned paper of your choice

Step 1

Die cut the above pieces in the quantities shown, using the 300gsm card for all the pieces except the top left, which you will cut from Classic card. You may wish to cut extra large circles to strengthen the base.

Step 2

Join the ling strips with the glue tabs to form a circle and fold in the tabs.

Step 3

Glue one large circle into the ring and then add another on top.

Step 4

This will form the base.

Step 5

Use the “slit “ die along with the medium circle die (lining up the notches) 

Step 6

Give the large die cuts a little curve with your bone folder and glue together to form a cylinder.

Step 7

Glue one of the slit circles into the bottom of the cylinder and glue the other on top of the glue tabs, lining up the slits. 

Step 8

Cut a 27cm x 12cm strip of patterned paper and glue around the cylinder. Cut a 1cm strip of matching paper and glue around the base.

Step 9

Die cut both shapes shown from Classic card (cutting 2 of the hinges)

Step 10

Glue the hinges to the pocket and then attach to the back of the central card. Glue the 2 handles together and attach to the top.

Step 11

Glue the other central card to the back. (You can leave this and attach the drawers to the second card before gluing them both together, as I have done in my video)

Step 12

Die cut the same shape from patterned paper, removing a sliver from each side and the glue tabs from the bottom. Glue to the pocket.

Step 13

Make the drawer compartment. (Repeat for each drawer)

Die cut 2 of the compartment shapes from Classic card and 2 little rectangles for the sides.

Step 14

Fold and burnish as shown.

Step 15

Glue the bases together as in the photo.

Step 16

Die cut 2 semi circles from 300gsm card. Glue on to the top of the compartment. Curve the tabs around the sides and glue onto the semi circle.

Step 17

Repeat for the bottom.

Step 18

Glue on the patterned paper side panels.

Step 19

Make 3 compartments and glue together as a stack.

Add another semi circle on top and add a decorative panel.

Step 20

Glue the stack of compartments to the central panel.

Step 21

Make the drawer (Repeat for the 3 drawers)

Die cut the shapes shown from Classic card and a decorative panel from patterned paper. Glue together in this configuration.

Step 22

Add decorative panels to the sides and inside.

Step 23

Use the 2 dies shown to make a decorative panel for the outer cylinder. Glue in place. 

Step 24

Die cut a medium circle from 300gsm card and glue to the base. Then glue the cylinder to the base platform.

Step 25

Because I have used paper with a bird on it, I used some Craft Perfect Jute twine to create a little nest and added some pearls into it. I also made a little tag to match.

Use Ruth's guide to create a variety of gorgeous Superb Slider Boxes

Crafting Essentials

]]>
https://www.marksymondsroofing.com/blogs/import-blog-tonic/christmas-tree-decoration-review 2022-07-07T16:00:02+01:00 2022-07-07T16:00:03+01:00 A festive Showcase review of the Christmas Tree Decoration Shopify API

This month’s Showcase die set creates a couple of different three dimensional Christmas Trees, and you assemble it in the same way as the previously released Family Tree die set, so if you loved that one, you’re going to love these 2 new tree shapes too! And although they’re designed as Christmas trees, you could definitely just make them winter trees or woodland trees too, so they’re not just for Christmas :D And they’re also not just for decoration too, you can still utilise the main tree panels on your cards as well! I’ve done a matching card for each of my three dimensional trees, and you can see they even work on small cards too.

Both trees have the ability to be intricate, solid, or you can combine the 2 and have the intricate detail on top of the solid. And you can mix up what you cut the pieces from too! For my icy tree, I cut the solid pieces from vellum, and I used lots of Nuvo to decorate the blue intricate die-cuts as well :D Or for a simpler look, your textured craft perfect card looks fabulous! Tonic have such a fab selection of green tones in the range so if you end up making a whole forest, they can all be different variations of green :D The new Sea Salt Green from the Spring Meadow colour trend would be fabulous for a silver spruce! 

Both trees have the ability to be intricate, solid, or you can combine the 2 and have the intricate detail on top of the solid. And you can mix up what you cut the pieces from too! For my icy tree, I cut the solid pieces from vellum, and I used lots of Nuvo to decorate the blue intricate die-cuts as well :D Or for a simpler look, your textured craft perfect card looks fabulous! Tonic have such a fab selection of green tones in the range so if you end up making a whole forest, they can all be different variations of green :D The new Sea Salt Green from the Spring Meadow colour trend would be fabulous for a silver spruce! 

In the die set, not only do we get the die for the 2 different trees, we also get a tonne of elements to decorate the trees with, a sentiment that has a backing piece that’ll hang perfectly on the tree, some tiny delicate sentiments and even some presents that could be tree decorations or that we could stack under the tree too :D I love that they’ve also included a couple of tag dies too, so if you loved the concept of the family tree, where you could add photos of family members hanging on the branches, you can do the same with this set, and you could even mix and match the sets too.

I think these trees will make the perfect decorations for your Christmas table, or why not even make a few to decorate your craft room! Don’t forget to share your makes on the Tonic Facebook page, or with the hashtag #showtonic so we can see what creations you’ve made :D Christine xxx

I think these trees will make the perfect decorations for your Christmas table, or why not even make a few to decorate your craft room! Don’t forget to share your makes on the Tonic Facebook page, or with the hashtag #showtonic so we can see what creations you’ve made :D Christine xxx

]]>
https://www.marksymondsroofing.com/blogs/import-blog-tonic/terrific-twist-tutorial 2022-06-16T16:00:03+01:00 2022-06-16T16:00:04+01:00 How To Construct The Terrific Twist Showcase Die Set Shopify API

Hello crafty friends, it's Terri on the blog today to share an overview, along with a construction tutorial for the latest marksymondsroofing Showcase die set. This die set enables you to create open topped boxes, which look like bowls, of two different sizes. The sides are made using the same panel dies, but there are both hexagonal and octagonal bases, meaning your bowl can be 6 or 8 sided. The 8 sided bowl is beautifully large, so much so that it inspired me to create something rather unusual with it – but more of that in a moment!


The side panels are a sort of fishtail or petal shape, and there is a very pretty verso die included in the set to enable you to create decorative panels to glue on top of your main, structural panels.

How to Construct the Terrific Twist Showcase

This construction tutorial will focus on creating a 6 sided bowl, so you will need to die cut six panels and 2 or 3 hexagons. You need one hexagon to adhere your six side panels to, and I added an extra to the top and the bottom for extra strength and to hid the glue tabs so it looks neater.

Step 1

The following process photos show you how to assemble the first few side panels. You bend and lightly burnish both of the tabs towards you. Next, using wet glue, you adhere 1 tab to the top of one of the sides of the hexagon and the other tab to the under side of the next side of the hexagon. It doesn't really matter whether you start with an under or an over, as long as with each panel, one tab is glued under the base and one tab is glued on top of the base. You will be using the other hexagon or octagon die cuts to cover the glue tabs anyway.

Step 2

Next you take the next side panel and adhere the first tab over the top of the side of the hexagon that has the tab of the previous side panel underneath it. The 2nd tab of the 2nd panel again glues underneath the next side of the hexagon. You have now attached 2 side panels.

Step 3

Continue with the 3rd panel as shown in the process photos.

Continue with the 3rd panel as shown in the process photos.

Step 4

Continue in this manner until all side panels have been glued to the hexagonal base. The last one may be a bit fiddly, but just take your time, it will be worth it.

Adhering the side panels together

To adhere the top of the side panels together, in order to close your bowl and create the unique twisted effect, apply a small amount of glue in the positions shown in the process photos (corner of side panel and underside of petal/flap). I found that to speed the process up, it was handy to have some small craft pegs to hold the panels to their neighbour while the glue was drying. You could also use paper clips if you didn't have any tiny pegs.

Step 5

After a few minutes you can remove the pegs/paper clips and your twisted bowl will be assembled and now comes the fun task of deciding what to put inside it! 

Ideas for using your Terrific Twist Bowl

• The sentiments included in the kit are all treat related so would be perfect for holding wrapped sweets or chocolates on your desk or on tables at parties.

• In one of my sample makes I cut a circle of card for a lid and partially die cut (using a very small circle die) a finger pull in one side, to hide the contents from view (see below)

• You could also use the Terrific Twist Showcase as either an open or closed top lantern. If you repeated the above step to create a lid, the top would be closed and if you used the verso die with or without a vellum backing and a battery operated tea light or small string lights, it would create a lovely glow for some ambient lighting in a room.

• You don't have to use the verso dies included, I'm sure you could find some other verso dies in your Tonic stash that would work. Alternatively you could use it as an excuse to break into some of those treasured, speciality paper or card stocks you may have been saving (if your anything like me!) and use the plain cutting die without the verso die to cut decorative panels of patterned paper or thin card.

• You could also go with a completely out of the box idea such as using it as a gift basket. If you cut a length of card stock and attached each end of it to opposite sides of the bowl with brads, it would make a lovely basket for a flower girl at a wedding, or an Easter basket.

• In my second make, I chose earth toned colours that reminded me of a terracotta pot and used a marksymondsroofing diet set to make some gorgeous flowers from classic craft perfect card. I added some leftover polystyrene into the base and glued it down, cut slits in it to hold the flowers in place and covered over the polystyrene with reindeer moss. The possibilities are as vast as your imagination!

I hope you have enjoyed this Terrific Twist Showcase overview and accompanying construction tutorial. I think it is an incredibly versatile die set and I just love the pattern of the verso die – it reminds me of mermaid scales. We'd love to see what you make so don't forget to tag marksymondsroofing in your makes on Social Media.

To see more of my makes, check out my socials:

Instagram: @veegstez

Facebook: Veegstez Creates 

Buy The Craft Project

]]>
https://www.marksymondsroofing.com/blogs/import-blog-tonic/ascot-gift-box 2022-06-02T16:00:04+01:00 2022-06-02T16:00:06+01:00 How To Assemble The Elegant Ascot Gift Box Showcase Set Shopify API

The beautiful Elegant Ascot Showcase die set contains 35 dies which you can use to create a gorgeous hat-box inspired gift box.

You can see my video below, where I show you how to make a different box and explain how some of the dies can be used for making cards.

What you will need

- Elegant Ascot Gift Box de set

- Craft Perfect Classic Card, Ivory

- Craft Perfect Smooth Card, Ivory (for handles)

- Craft Perfect Speciality Paper, Marshmallow Pink

- Silver Mirror Card

- Nuvo Deluxe Adhesive

- Craft Perfect Ribbon, Glacier grey 9mm and Sweet Pink 3mm

- Tangerine Die Cutting Machine

Step 1

Die cut 2 large circles and 3 smaller circles from ivory card and a smaller circle from Marshmallow Pink Paper.

Step 2

Die cut 2 ivory lid skirts, 2 ivory lid tabs and 2 Marshmallow Pink Stitched Strips.

Step 3

Fold in the side tabs on both of the lid tab dies, add glue and attach to one of the large circles. Align the score lines at the ends of the tabs and attach the second tab in the same way.

Step 4

Glue the second large circle on top to cover the glue tabs.

Step 5

Glue the pink paper to the lid skirts and shape with a bone folder.

Step 6

Glue these to the lid tabs.

Step 7

Glue the pink circle to a small ivory circle.

Step 8

Glue this to the top of the lid.

Step 9

Die cut 2 large side panels from ivory card and 2 pink decorative panels.

Step 10

Glue these together and shape with a bone folder.

Step 11

Attach these to a small ivory circle in the same way as you made the lid.

Step 12

Cut 2 ivory stitched strips and glue around the top of the gift box.

Step 13

Glue a smaller ivory circle to the base of the box to cover the glue tabs.

Step 14

Die cut 2 handles from the ivory smooth card, and 3 strap joins from silver card.

Step 15

Attach the 2 handle die cuts together by folding the tabs at one end of each through the strap join.

Step 16

Fold the tabs back and glue in place.

Step 17

Glue a strap join on the back to cover the glue tabs. Glue the other one on the front.

Step 18

Die cut 8 Handle Swivels, 6 Handle axles and 4 Handle Clasps.

Step 19

Glue 3 handle axles together and then glue onto a handle swivel, aligning the slits. Repeat.

Step 20

Glue 2 handle clasps together. Repeat.

Step 21

Place a handle clasp on top and add glue to the top of the axle (NB not on the handle clasp)

Step 22

Glue another handle clasp on top.

Step 23

Fold back the tab at one end of the handle and glue into the handle clasp. Repeat. Glue the remaining handle clasps on the back and front of the others as before to cover the glue tabs on the handle.

Step 24

This is how the handle should look now.

Step 25

Glue the handle clasps to each side of the lid.

Step 26

Use the small circle die with the patterned die to cut out a patterned circle and glue to the lid of the box. 

Step 27

Wrap a length of ribbon around the gift box and glue a bow on top.

Step 28

Use the dies shown to die cut a tag and attach to the handle with pink ribbon.

Step 29

The completed box!

Buy The Craft Project

]]>
https://www.marksymondsroofing.com/blogs/import-blog-tonic/baby-gift-box-make 2022-05-12T16:00:03+01:00 2022-05-12T16:00:05+01:00 Craft The Perfect Gift Box For The New Baby Arrival In Your Life Shopify API

The Up, Up and Away Showcase die and Stamp set from Tonic has 40 dies in total and I’m going to show you how you can use them to make a beautiful gift box for a baby present.

What you will need

- Up, Up and Away Die and Stamp Set

- Craft Perfect Smooth White Card (300gsm)

- Craft Perfect Classic Card, Cornflower Blue

- Nuvo Deluxe Adhesive

- Hi tack tape

- Craft Perfect Foam Pads

- Magnets

- Craft Perfect Arctic Blue Double Face Satin Ribbon, 9mm

- Blue and White Baker’s Twine

- Alphabet die set or stamp

- Tangerine Die Cutting Machine

Step 1

Die cut 6 of the Balloon Base shapes from white card.

Step 2

Die cut 6 of the Balloon Lid shapes from white card.

Step 3

Using the 2 dies shown, die cut 6 blue decorative panels and glue them to the lids.

Step 4

Using both dies shown die cut 6 blue decorative panels and glue them to the balloon bases.

Step 5

Gently shape the balloon base pieces with a bone folder.

Step 6

Attach the base pieces together by the tabs with hi tack tape. NB. Attach the top and bottom tabs together first and the ones in between will easily fall into place.

Step 7

Shape the balloon lid pieces in the same way and attach together with hi tack tape on the tabs.

Step 8

Die cut the hexagonal roof.

Step 9

Glue the roof to the top of the lid.

Step 10

Use magnets to connect your balloon base to the lid. Glue 2 small magnets to the inside of the balloon base with each on opposite sides of the rim. Place a second pair of magnets on the outer face of the same panels but DO NOT glue these in place. Allow them to be held in position by the attraction of the magnets on the inside. Place a glue dot on the exposed outer face of the two outer magnets.

Step 11

Carefully position the finished balloon lid over the finished balloon base. Press the sides at the magnet area to transfer the positioned outer magnets from the base to the lid.

Step 12

To create the basket, die cut 6 of the shapes above using the 2 dies shown. Then cut a hexagonal base.

Step 13

Use the 2 dies shown to cut 6 blue patterned panels and glue to the bases. Glue together.

Step 14

Glue all the sides together to form the base.

Step 15

Glue the basket onto the base and add ribbon and a bow. 

Step 16

Die cut a blue tag and white letters and glue together. Add some twine to the tag. Poke a little hole in the top of the balloon and push the twine through.

Step 17

Die cut a small blue hexagon and glue inside the lid to cover where the twine has been attached.

Step 19

Stamp the Special Delivery onto white card and die cut with the banner die. Die cut a blue banner and glue both banners together, then attach to the hot air balloon with a 3D foam pad.

Buy The Craft Project

]]>
https://www.marksymondsroofing.com/blogs/import-blog-tonic/potted-plant-gift-wrap 2022-04-28T16:00:06+01:00 2022-04-28T16:00:08+01:00 How to gift wrap a potted plant with a handmade touch Shopify API

The new Garden Greeting Showcase from Tonic is just my kind of thing!

I love nature and anything that I can make which reflects some nature in it is definitely a winner in my books!

What you will need

This is the die set and it obviously can be used to make cards, decorate scrapbook pages, add a touch of the garden to memory books etc but today I’m showing you how to use the dies to make a plant gift wrap!

- Garden Greetings Showcase die set

- Craft Perfect Smooth White Card

- Craft Perfect Pearlescent Card, Gleaming Lilac

- Craft Perfect Classic Card, Arctic Blue

- Nuvo Deluxe Adhesive

- Craft Perfect Double Sided Tape

- Silver Sequins

- Liquid Mercury Crystal Drops

- Arctic Blue Double Satin Ribbon, 9mm

- Nuvo Alcohol Markers, Pillow Mint Pea Pod, Sweet Blossom, Violet Breeze and Spring Lilac

Step 1

Cut the pieces you need for the main construction of the box as shown. I’ve opted for a smooth card for this project, as some pieces will be seen from both sides so a textured card (such as Craft Perfect Classic) wouldn’t work so well in this case. I have cut the decorative panel into one of the lid pieces, to allow a battery light to go inside the box and shine through.

Step 2

Snip the two decorative panels off one of the lid pieces as shown. This will create the bottom of the box.

Step 3

Glue the two side panels together, and then adhere these to the base that you have taken the decorative panels off. This will form the main construction of the finished box. 

Step 4

Next we’ll assemble the drawer. Cut the large centre glue tab off one of the drawer halves.

Step 5

Glue the two drawer halves together using the large centre glue tab.

Step 6

Fold along all the scores and glue tabs around the drawer sides, and adhere them all. The last step is to glue the second drawer panel inside the box, and this provides additional strength to the drawer, along with hiding all the inner glue tabs.

Step 7

For the lid panel, fold the glue tabs down, and then fold the two decorative front panels up along the score lines. Glue the decorative panels together at the front to create the front face of the box.

Step 8

Die cut a piece of Vintage White Vellum Paper using the smaller hexagonal die, and adhere this to the underside of the lid piece. This allows you to add a battery tea light or string lights inside the box, and the glow will be seen through the detail cut into the lid.

Step 9

To help get the lid of the box in the perfect position, I find it easier to sit the drawer into the box, and then glue the lid over the top of it. This will ensure that there is enough room for the drawer to move in and out of the box once it is assembled.

Step 10

Now that the basic box is constructed, it’s time to decorate! I’ve gone for one of my favourite colour schemes for this: Burnished Rose Satin Mirror and Platinum Rose Mirror Card. There are many different pattern options to choose from, here I’ve chosen a more open pattern so you can see plenty of the Burnished Rose card in the background. I have also cut a hexagonal panel of Platinum Rose to line the inside of the drawer, as this will help reflect the tea light or lights you place in the box later.

Step 11

To help get the lid of the box in the perfect position, I find it easier to sit the drawer into the box, and then glue the lid over the top of it. This will ensure that there is enough room for the drawer to move in and out of the box once it is assembled.

Step 12

Now that the basic box is constructed, it’s time to decorate! I’ve gone for one of my favourite colour schemes for this: Burnished Rose Satin Mirror and Platinum Rose Mirror Card. There are many different pattern options to choose from, here I’ve chosen a more open pattern so you can see plenty of the Burnished Rose card in the background. I have also cut a hexagonal panel of Platinum Rose to line the inside of the drawer, as this will help reflect the tea light or lights you place in the box later.

I thought I’d share one last photo….when I took the plant outside to take a photo a little ladybird (the first one I’ve seen this year!) appeared from the periwinkle plant and climbed onto my plant pot for an impromptu photo shoot!

Buy The Craft Project

]]>
https://www.marksymondsroofing.com/blogs/import-blog-tonic/3-card-makes-dandelions-dragonflies 2022-03-26T16:00:10+00:00 2024-04-16T16:43:20+01:00 3 Different card techniques using the Dandelions & Dragonflies Die Set Shopify API

Hello crafty friends, it's Terri back on the blog today to share an overview, along with some tips and ideas on how to use this fab Showcase set. This stamp and die combo is extremely versatile and I made 3 completely different cards with it and have barely scratched the surface of what can be created.


The set includes a stamp set with gorgeous images of dandelions, dragonflies and some lovely sentiments for all occasions. The die set has some dies that correspond to the stamps, to save you fussy cutting them, along with a series of intricate verso dies, plus some extra cute little dies like a butterfly and a tiny dragonfly.

Step 3

There are 4 half circle verso dies, with intricate dandelion and dragonfly detailing and a regular half circle. These half circle dies are perfect to use on Z fold cards (where the front of a side opening card is folded in half vertically) as they cut a beautiful pattern into the card, using the following steps.

Step 3

You can see here how I completed the above steps and then added speciality card stock over top, along with a frame, which we will come on to in a moment.

Step 3

There are two decorative edged dies that are a circular(ish) shape, which can be used on their own, to make a decorative topper, or in conjunction with one of the solid circle or scalloped circle dies included to make a frame. Below I have used one of the decorative dies on its own and also created a topper using the scalloped circle die and the two dragonfly verso dies. You can also see how I made a frame using the dragonfly circular die with the scalloped circle die to make a frame from the stunning holo waves mirror card.

There are two decorative edged dies that are a circular(ish) shape, which can be used on their own, to make a decorative topper, or in conjunction with one of the solid circle or scalloped circle dies included to make a frame. Below I have used one of the decorative dies on its own and also created a topper using the scalloped circle die and the two dragonfly verso dies. You can also see how I made a frame using the dragonfly circular die with the scalloped circle die to make a frame from the stunning holo waves mirror card.

Step 3

The addition of the circle dies to this set inspired me to create a circular aperture in the front of a square card blank and decorate both the front and the inside. This is a very easy concept but makes a really pretty card. I cut several of the dandelion verso dies into pieces of 300gsm white Craft Perfect and snipped out the dandelions, before adding them around the outside of my circle aperture. In between each of these I stamped a dandelion in blue mineral. 

Step 3

To complete the card I created a simple pond scene for inside the card and added an identical frame to match the front of the card. A touch of Crystal glaze to the lily pad gives a lovely shiny effect. I first stamped the lotus flower onto a white scalloped circle, then stamped the lotus flower onto some masking paper and fussy cut that, placed it on top and then stamped the lily pad, to achieve the effect of the lotus flower sitting on top of the lily pad.

To complete the card I created a simple pond scene for inside the card and added an identical frame to match the front of the card. A touch of Crystal glaze to the lily pad gives a lovely shiny effect. I first stamped the lotus flower onto a white scalloped circle, then stamped the lotus flower onto some masking paper and fussy cut that, placed it on top and then stamped the lily pad, to achieve the effect of the lotus flower sitting on top of the lily pad.

Step 3

The images in the stamp set are perfect for heat embossing too. For one of my card samples I stamped and heat embossed in white embossing powder the two dandelion stamps, all over a 4 ¼ by 5 ½ inch card panel. I then chose 3 complementary colours of Nuvo hybrid ink and ink blended the entire panel, before wiping off any excess ink from the heat embossed dandelions. This made for a beautiful background for one of my cards.

The images in the stamp set are perfect for heat embossing too. For one of my card samples I stamped and heat embossed in white embossing powder the two dandelion stamps, all over a 4 ¼ by 5 ½ inch card panel. I then chose 3 complementary colours of Nuvo hybrid ink and ink blended the entire panel, before wiping off any excess ink from the heat embossed dandelions. This made for a beautiful background for one of my cards.

In summary, this versatile set is perfect for:

• Making Z fold or fancy fold cards with the half circle verso dies

• Making aperture window cards and decorating the front and inside of your make

• Stamping and then heat embossing the pretty and elegant stamps

• Stamping and simply colouring the basic stamps

• Snipping out elements from the verso die cuts to add dimension to your make and to use creatively however you wish! (Though I personally love the classy look of white on white)

I hope you have enjoyed this overview of this fab Showcase set. I think it is incredibly versatile, especially with the sentiment stamps that are included. “You blow me away” is perfect for a card for your partner or someone who has just had a big achievement and “Flying by to say hi” is perfect for a thinking of you card, when you just want to let someone know that you care and lets face it, who wouldn't want to receive a card like that.

Happy crafting, Terri (VeegsTez Creates)

To see more of my makes, check out my socials:

Instagram: @veegstez

Facebook: Veegstez Creates 

Buy The Craft Project

]]>
https://www.marksymondsroofing.com/blogs/import-blog-tonic/pop-up-surprise 2022-03-03T16:00:06+00:00 2022-03-03T16:15:39+00:00 How to craft the Pot of Happiness complete with a pop up surprise Shopify API

The "Pot of Happiness" Showcase die set contains 32 different dies which you can use to make a 3D flower pot with flowers or a cone with ice cream, both with a mechanism to move a little label up and down inside the pot.

I'm showing you how to make a flower pot with flowers here but you can see how I made the ice cream come and also how I die cut it slightly differently in my video here

What you will need

- Pot of Happiness die set

- Craft Perfect Smooth White Card

- Craft Perfect Miami Mint Speciality Card

- Craft Perfect Classic Card, Buttermilk Yellow, Spearmint Green

- Nuvo Glitter Drops, Honey Gold

- Craft Perfect Hi Tack Tape

- Nuvo Deluxe Adhesive


Step 1

Die cut the large pot size die together with the patterned die from white card. Die cut the smaller pot die from green card.

Step 2

Die cut a white tabbed pocket with a slot by positioning the slot die as shown.

Step 3

Glue the green die cut behind the white patterned die cut. Fold the tabs on the pocket backwards and add hi tack tape to the outer tabs.

Step 4

Die cut the long folding tab and one of the dies with the slits.

Add narrow hi tack tape to the narrowest areas and feed through the slits in the other die cut.


Step 5

Attach the narrow areas with the hi tack tape to form a tab.

Step 6

Die cut a pop up and use the same die along with a sentiment die to create a green pop up. Glue the green die cut on top of the white one.

Step 7

Glue the base of the pop up stick to the front slider plate and slider bar.

Step 8

Push the mechanism tabs through the slot in the pocket.

Step 9

Attach the pocket to the back of the pot die cuts.

Step 10

Die cut the base and sides of the pot and add hi tack tape to the tabs.

Step 11

Attach the base and sides to the front of the pot.

Step 12

Die cut this tab with slits again.

Step 11

Push the tabs from the slider mechanism through the slits of the small tab, fold over each other and glue in place.

Step 12

Die cut the small tab shape, score and fold, then add hi tack tape and adhere the 2 centre pieces together to create a tab.

Step 11

Fold around the back of the tab (from pic 13) and glue to secure.

Step 12

Die cut the large pot from white card, placing the positioning slot die in the centre to create the large slot.

Step 11

Push the slider mechanism through the back panel and adhere to the back of the pot.

Step 12

Die cut a large green pot, also with a slot and glue to the back of the pot.

NB make sure to only add glue around the outside of this die cut so that the slider mechanism can move freely!


Step 11

Die cut large yellow flowers, green stems, medium green flowers, small white flowers. Emboss/ shape the flowers and assemble. Glue inside the pot and add Honey Gold Glitter Drops to the centres of the flowers.

Finished Make

Buy The Craft Project

]]>
https://www.marksymondsroofing.com/blogs/import-blog-tonic/scenic-sentiments-showcase-review 2022-02-17T16:00:09+00:00 2022-02-17T16:00:11+00:00 A crafty review of the Scenic Sentiments Showcase Die Set Shopify API

The Scenic Sentiments Showcase die set contains 25 dies in total. There is a 9.75cm x 12.75cm rectangle die and 4 different "scenes" which fit inside it.

You will need to use the rectangle with the scene dies to cut out the shapes above. The die cuts are

a) 2 butterflies, b) an open window with a tropical plant on a window ledge,

c) a peacock and d) hibiscus flowers.

There are also 8 different sentiment dies with all have backing plates. 

There are also 3 leaves which match the window scene and a single hibiscus flower which can be used with the spray of hibiscus flowers.

All of the scene die cuts can be paper pieced. You can also paper piece the single hibiscus flower and this can be done in a single colour or, as I have done here, you can add complementary shades. Nuvo Deluxe Adhesive is great for this job! I have glued the flower onto a piece of white card and cut around it first but you could add it straight to your card and paper piece there.

All of the scene die cuts can be paper pieced. You can also paper piece the single hibiscus flower and this can be done in a single colour or, as I have done here, you can add complementary shades. Nuvo Deluxe Adhesive is great for this job! I have glued the flower onto a piece of white card and cut around it first but you could add it straight to your card and paper piece there.

There are so many different ways of using this set that the only limit is your imagination. I have cut out all my shapes from white card but obviously they can be cut in any colour you prefer and would look very dramatic in black!


One way to use these would be to paper piece them and use different colours of card to fit back into the areas which have been removed. I've steered away from this more obvious use to give you some different examples and ideas.

I fell in love with this peacock as soon as I opened the packet and knew I had to make it sparkle!

I glued the die onto a white rectangle and sprayed some Sparkle Spray into a container and used a fine Nuvo paint brush to pick up the colours and colour the peacock. You really need to see this one in real life to get the full bling effect!

I added a second white die cut over the top to keep the outline crisp and clean.

You can see how I did this and also the card below in my video here

Another way to make a card with the set is to add some colour and depth with Nuvo pencils. In this example I have layered the butterfly die cut onto Ocean Blue card and then added shading into the wings with True Blue and Scuba Blue Classic Colouring Pencils. This is a much quicker way to make a card than the previous one. Just add matching card and Morning Dew Crystal Drops to make your card pop!

The die cuts don't have to be left plain white and in this example I have coloured the window and plant with Nuvo alcohol markers.


It's a good idea to reserve the larger "waste" parts from the right sides of the die cuts as you can colour these in different ways and glue them back into place.

I've also paper pieced some of the other pieces back into this die cut but left some open. Don't be afraid to mix and match!

You could use many different mediums such as watercolour pencils, shimmer powder. mousse etc but I have used the Clear Water Aqua Flow pen to colour the sky in the window scene above and then smudged it slightly with a paper towel to give a cloudy effect.

I have also used the extra leaf dies to add some more detail onto the plant and I've added some shading to these with the Pine Grove Nuvo Alcohol Marker.

The Hibiscus flower scene die cut can be used in many different ways, not least paper pieced! This would be perfect for adding different depths of the same colour back into the flower heads to make them pop!


For my example I have coloured the back of the petals and leaves with red and green Classic Colouring pencils and then glued the die cut onto vellum. Because vellum has a very translucent quality, I wanted to add more punch so I added some Crystal Drops into random petals and leaves and some Buttermilk Crystal Drops onto the styles and anthers of the flowers.


I'm sure there are many more ways in which you could use these dies!

Enjoy! :)

]]>
https://www.marksymondsroofing.com/blogs/import-blog-tonic/perfect-tulips-bouquet 2022-02-05T00:00:05+00:00 2023-12-22T16:29:59+00:00 Follow this tutorial and learn how to create this perfect tulips card Shopify API

Hi my name is Shilpa, and I’m here to share with you all a card using the beautiful Perfect Tulips Stamps & Die Set.

I really enjoyed using the many different dies in this set, each section has very pretty details.

I loved the Tulip designs throughout – in the stamps and dies! Lovely set to cut out and to colour, using whatever colour combos your heart desires.

Hope you enjoy recreating the card I am sharing with you today.

Step 1

Select the dies you see in the photo. You will need to place your dies on some Craft Perfect 300gsm White Smooth Card and pass through your die cutting machine (use low tac tape to hold your dies in place). You will need to cut the full design three times and the bottom section three times, as we need four vertical panels as you see in the photo.

Step 2

Now using marksymondsroofing 6” x 6” Ivory White card blank as the base, lay down the cut tile designs as shown in the photo. You can use a ruler to measure precisely, or as do it by eye as I have done.

Step 3

Once you’re happy with your layout, section by section stick them down with Tonic Deluxe Adhesive as shown in the photo. Then put aside to dry and work on next steps.

Step 4

Take the vase dies and cut the solid shape using Craft Perfect Pearlescent Lemon Lustre Card and the decorative top layer using Craft Perfect Polished Gold Mirror Card. Stick them together using Tonic Deluxe Adhesive.

Step 5

Now taking more of the Craft Perfect 300gsm White Smooth Card cut out both sizes of the tulip dies as shown in the photo. Four large and three small.

Step 6

You can now colour your flowers in. I have used marksymondsroofing Aqua Flow Pens with a Tonic Water Brush to create a watercolour affect.

Colours used - Indigo Dawn 903n & Sweet Pea 925 for the flower heads and Evergreen Fern 902n for the stems and leaves.


Step 7

Now take the vase and add Craft Perfect Redline Tape to the back and stick the flowers as you desire to create the look of the flowers in the vase. Then use Craft Perfect Dimensional Foam Pads and add the vase along with the flowers on top of the ‘tiled’ card base, as shown in the photo. To finish the card stamp and add a sentiment from the coordinating stamp set with Black Shadow Ink Pad. Use a simple shape to stamp your sentiment on. (I have used small nesting dies from an older Tonic die set.) Finally add a mini bow on the vase using Craft Perfect 3mm Double Face Satin Ribbon in Aubergine Purple. This finishes the card.

Buy The Craft Project

]]>
https://www.marksymondsroofing.com/blogs/import-blog-tonic/mixed-media-shabby-chic-card 2022-01-18T16:00:01+00:00 2024-04-16T16:40:13+01:00 How To Create This Shabby Chic Love Card Using Mixed Media Shopify API

Hey crafty friends and a very Happy New Year to you all!

Today I bring you this vintage feel card made using the brand new Showcase ‘Loveable Library’ stamp and die set. As soon as I saw the set, it instantly made me think of a ‘shabby chic’ and ‘distressed’ look and made me want to try and combine it with another Tonic product - the ‘Beautiful Memories’ patterned cardstock set. I am a massive fan of kraft card, especially when combined with distress inks; so I thought it might be fun to create a bit of a mixed media layout for this ‘love’ themed card. It is not a valentine’s card in the traditional sense, but I think the sentiments from the set are ideal for use in valentine’s crafts or just as a way of expressing to a loved one how you feel.

As it’s multi-layer, muti-media, there’s a fair few steps to this one… so let’s get crafting!

What you will need

- Showcase ‘Loveable Library’ Stamp & Die set

- ‘Handwriting’ stamp from Stamp Club: Patterns & Prints (or similar)

- Craft Perfect 7x5” card blank - Bright White

- Nuvo Hybrid Inks - Metro Grey & Soft Suede

- Nuvo Embossing Powders - Copper Blush & Glacier White

- Nuvo Chalk Mousse - Coconut Sorbet

- Nuvo Clear Mark Embossing Ink

- Nuvo Clear Mark Pen

- Nuvo ‘Brilliantly Vibrant’ Classic Colour Pencils

(White Cotton, Imperial Jade, Lemon Grass, Cocoa Bean & Cotton Candy)

- ‘Beautiful Memories’ cardstock set

- Craft Perfect Card - Kraft & Olive Green Classic

- Tonic ‘Simple Hearts’ Stencil

- Craft Perfect - Tissue Tape, Deluxe Adhesive & Foam Pads

- Vellum Paper

- White gel pen

- Stamping platform or clear acrylic stamping blocks

- Tonic Magnetic Crafter’s Platform

- Long bladed scissors or paper trimmer

- Small ‘detail’ scissors

- Heat tool

- Blending Dauber

- Spatula

- Anti-static bag

Step 1

Cut a base 17 x 12cm out of kraft cardstock

Step 2

One of the designs in the ‘Beautiful Memories’ patterned cardstock set contains six postcard designs. Locate this sheet and cut out the bottom right postcard.

Step 3

Using a blending dauber, ink the edges of both the postcard and kraft base in ‘Soft Suede’ Nuvo Hybrid Ink to give them a worn, distressed feel. Finally, add a few splatters of black paint to your kraft base. (This isn’t completely necessary but I do love a good splatter! I think it adds to the distressed aged effect of old paper)

Step 4

Adhere your postcard to the kraft base at a slight angle and hanging over two of the kraft base edges. The overhang will be trimmed off at a later point.

Step 5

Using the handwriting stamp from Stamp Club ‘Patterns & Prints’ or something similar, randomly stamp in areas across both the postcard and the attached kraft base in ‘Metro Grey’ Nuvo Hybrid Ink

Step 6

Covering the majority of the bottom right-hand-side, lay the ‘Simple Hearts’ stencil approximately as shown, secure into place and then, using a spatula, apply Nuvo ‘Coconut Sorbet’ Chalk Mousse. Try not to apply it to every heart shape or particularly evenly, this will help try and achieve a worn, distressed, uneven look. Set aside to dry.

Step 7

In the meantime, using your Nuvo ‘Soft Suede’ Hybrid Ink, stamp out the rose image from the ‘Loveable Library’ set twice.

Step 8

Colour the rose images using coloured pencils to resemble a similar colour palette to those in the ‘Beautiful Memories’ patterned cardstock.

Step 9

Cut out your roses using fine detail scissors.

Step 10

Once the chalk mousse has dried, in Nuvo Clear Mark Ink, randomly stamp both the larger and smaller ‘ink splatter’ images over areas of the page as shown. Then add the Copper Embossing Powder and heat set using a heat tool.

Step 11

On some vellum, stamp out the feather quill image in clear ink and add some ‘Glacier White’ Nuvo Embossing Powder. (I find embossing powder likes to stick in many ‘unwanted places’ on vellum so an anti-static bag or homemade pop-sock containing cornflour is a really handy tool to have at hand.)

Cut out the feather using fine detail scissors and gently bend it along the centre to give it a curved, more 3D effect.

Step 12

In clear ink, stamp out the rounder ink bottle shape and heat emboss in white embossing powder.

Step 13

Using a clear mark pen, ‘colour in’ the centre of the ink bottle as shown. Then apply and set the copper embossing powder. Using a white pencil, colour the outer edges of the bottle to give it a ‘glassy’ look. 

Step 14

Using a paper trimmer or long bladed scissors, trim off the overhanging edges to bring your base back to a rectangle.

Step 15

On kraft card, stamp out the ‘I love you more than words can say’ sentiment in ‘Metro Grey’. Trim around it in a rectangular shape and stamp an off-set rose image in the background in ‘Soft Suede’. Using the same ink, distress the edges of the sentiment. Next, adhere to some ‘Olive Green’ cardstock and trim leaving a thin border. Hand draw an additional border on the kraft card using a white gel pen.

Step 16

Cut out the ‘flower stamp with bee’ image from your patterned cardstock.

Step 17

Attach your cardbase to your 7x5” white card blank. As the kraft card had slightly ‘warped’ from the heat tool, I found the best way to stick it down smoothly was to run tissue tape closely around the edges and use liquid glue in the centre.

Step 18

Glue your ‘stamp’, glass bottle and first rose directly onto the page as shown. For the vellum feather, I used tissue tape (along the bent centre) so it wouldn’t show through.

Step 19

On kraft card, stamp out the ‘I love you more than words can say’ sentiment in ‘Metro Grey’. Trim around it in a rectangular shape and stamp an off-set rose image in the background in ‘Soft Suede’. Using the same ink, distress the edges of the sentiment. Next, adhere to some ‘Olive Green’ cardstock and trim leaving a thin border. Hand draw an additional border on the kraft card using a white gel pen.

And there you have your final, mixed media crossed with shabby chic, ‘love’ themed card!

I hope this has inspired you to have a play around with combining lots of different media to see what effects and layers you can create or to consider perhaps a less traditional approach to your Valentine’s Day cards this year.

Either way, have fun and happy crafting!

Buy The Craft Project

]]>
https://www.marksymondsroofing.com/blogs/import-blog-tonic/haberdashery-inspired-card 2022-01-06T16:00:00+00:00 2022-01-06T16:49:16+00:00 A creative and beautiful card to craft for a sewing enthusiast Shopify API

Hello lovely crafty friends. I sure hope the new year has been good to you all so far. Today we will be making this collage style card which is a new style for me so something new for the new year :) I’m “sew” glad to be sharing this with you all.

What you will need

Sew happy stamp and die set

1x Ivory white 5 x7 Card base

1x A6 misty grey classic card

1x A6 welsh gold glitter card

1x A6 glazed chestnut

pearlescent card

A bit of Rose Platinum mirror

card, Sienna Treasure

specialty card, Rose Gold

Blossom foiled kraft card,

embossed specialty paper of

your choice, kraft card and

white card

A bit of black tulle (or whatever

colour you want)

Redline tape

Nuvo deluxe adhesive

Die cutting machine


Step 1

We will make all the elements then put the card together. So let's start with the sewing machine. Die cut x2 detailed sewing machines and x1 outline out of the glazed chesnut card. Also, die cut one detailed machine from the platinum rose gold mirror card but leave it in the die to make it easier to paper piece.

Step 2

Stick your detailed machine die cut over the outline die cut,be careful not to glue down the thread bits of the machine so that we can do step 3. Inlay (put the pieces in the coordinating holes) the rose gold pieces.

Step 3

Trim off the excess card around the machine so that you are left with a machine that looks like the picture, then add the other detailed machine die cut over the top. If at any point you are confused please refer to the pics.

Step 4

Next we are going to die cut x2 dress forms from the foiled kraft card and 1 dress die cut from the embossed specialty paper. Glue the dress forms together to create a stronger one piece then glue the dress over it. If only it was this easy to make a dress right?!

Tip: I rubbed some soft suede over the top of my embossed paper dress just to add some interest to the design

Step 5

Add some redline tape to the waistline of your dress form piece. Grab your pieces of tulle and pinch them together just to create some shape, then stick them to the redline tape at the back of the dress form.

Step 6

Cut a panel that's 3.5” x 4.5” from the glitter card and a 3” x 4” panel out of the misty grey. Card. Use the edge die to give the glitter card a zig zag stitch edge and use the stitch stamp to add some stitch lines to the edges of the grey card.

Tip: you can use white gel pen to make the stitches on the glitter card more visible.

Step 7

Cut a 1.5” x 2” piece of white card and a 1.5” x 1.5“ piece from the sienna treasure card. Use the edge die to give your sienna treasure piece the look of a fabric swatch. You can use a paperclip to hold the pieces together. Also, use pens to add details and make it really realistic.

Step 8

Grab a small piece of kraft card and stamp the tape measure design onto it. Use a bone folder to curve it slightly. All the elements are ready, lay them on your card to figure out the layout then use a pencil to mark the placements. Once you know where everything is going, stamp on your sentiment.

Step 9

Glue down your pieces in this order. Start by adding the glitter gold and misty grey faux fabric pieces at an angle. Next add your sewing machine and try to place it as straight as you can. (You can add foam tape just to the top of your machine die cut to add some dimension.) Then add your tape measure right under your machine. Next, add your fabric swatch piece and lastly your dress form with a bit of foam tape as well to keep the dimension of that tulle.

Step 10

Finish your card with some accessories. I have gone for some staples, a button and some sequins. But you can add any extra detail you want there's definitely plenty of die and stamp options in this set. Just remember this is a collage card so the placement is always flexible just make sure you are having “sew” much fun as your craft always!

Buy The Craft Project

]]>
https://www.marksymondsroofing.com/blogs/import-blog-tonic/hand-crafted-cuckoo-clock 2021-12-26T16:00:15+00:00 2024-04-16T16:38:16+01:00 How to make a decorative cuckoo clock using card & a die set Shopify API

The Cuckoo Clock Die Set from Tonic's Showcase Collection makes the most adorable 3D ........Cuckoo Clock! It can be used as a gift box with either a top or bottom opening. It brought back so many memories of many lovely holidays in Switzerland and the Black Forest and I couldn't wait to get started.

What you will need

- Cuckoo Clock Die Set

- Craft Perfect - Ivory Card 

- Craft Perfect - Rose Pink Card

- Craft Perfect - Gold Mirror Card

- Craft Perfect - Avocado Card

- Craft Perfect - Misty Grey Card

- Nuvo Deluxe Adhesive

- Party Pink Crystal Drops

Step 1

Die cut 2 of each of the dies shown (sides, back and front) from Ivory card. Fold at the score lines and burnish.

Step 2

Use both dies shown to create 2 patterned panels from Rose Pink card and glue to the centres of the side panels.

Step 3

Die cut the plain outer die from Rose Pink card and glue to the back of the clock. Use all 3 dies together to cut out the panel for the clock front. Glue both die cuts to the front and back panels.

Step 4

Use the small arched die to create the doors. Cut out the cuckoo from Misty Grey card and glue behind the aperture.

Step 5

Die cut an Ivory circle for the clock face. Use the same die with the slightly larger scalloped die to cut out a gold clock frame and the small die shown at the bottom right to cut out gold clock hands.

Step 6

Glue these pieces in place.

Step 7

Cut off the piece shown from one side panel, then glue the panel to the back of the clock using the glue tabs.

Step 8

Glue the other side on in the same way, gluing the tabs together at the top.

Step 9

Glue the front in place in the same way.

Step 10

Die cut an Ivory window and shutters. and a little fence. Die cut 2 pieces of Avocado Green Ivy and glue in place.

Step 11

Die cut 3 of the roof tile shapes from Rose Pink card. Fold one and burnish the fold line well. Glue to the top of the clock, only adding glue along the top edge. Snip the other 3 in half and glue the tiles onto the roof, tucking the bottom edges in below the tiles above.

Step 12

Die cut the foliage from Avocado Green and glue to the side panel. Die cut one of each of the flowers from Ivory card, shape with an embossing tool, glue together and glue on top of the foliage. Add a Crystal Drop in the centre.

Step 13

Die cut 2 pieces of Avocado Green ivy. Snip a little off to shorten and glue to the front of the clock as shown

 I made a dark clock, using shades of brown card to resemble an actual wooden clock (like the one we were given as a present by a lovely German family who came to stay with us) and two other variations on that and you can see how I made them in my video here 

However, for this blog post, I thought I'd add a burst of colour!

Buy The Craft Project

]]>
https://www.marksymondsroofing.com/blogs/import-blog-tonic/handcrafted-spinner-card 2021-12-07T15:55:00+00:00 2021-12-07T15:55:01+00:00 Handcrafted Celebratory Spinner Card Tutorial With Ruth Hamilton Shopify API

If you're looking for a fab die and stamp set to say "Congratulations" to someone or to have handy for occasions when you need it, look no further! The new Ribbon Rosette Stamp and Die set has everything you need :) 

To make this Spinner Card you will need the following products along with the Showcase set

  • Craft Perfect Bright White 6x6 card blank
  • Craft Perfect Arctic Blue Texture Weave Card
  • Craft Perfect Silver Silk Speciality Card
  • Craft Perfect Chrome Silver High Gloss Mirror Card
  • Ivory Seashell Crystal Drops

  • Nuvo Deluxe Adhesive
  • Layering Circle Dies
  • White thread
  • White card

Step 1

Cut a 14cm square of Arctic Blue card and glue to the card front.

Step 2

Die cut a 10.5cm diameter circle from the card. Reserve the blue circle.

Step 3

Using both dies shown, die cut a silver Rosette.

Step 4

Use the outer Rosette die to cut out 2 of the blue outer shapes.

Step 5

Glue a length of thread down the centre of one of the blue shapes.

Step 6

Glue the two blue shapes together with the thread down the centre and then glue the silver rosette on top.

Step 7

Glue the thread tightly at the top and bottom of the aperture on the inside of the card. Cover with white card.

Step 8

Glue the blue circle from the front of the card directly behind the aperture.

Step 9

Front view.

Step 10

Use both dies shown to cut out the silver sentiment circle and then the outline die to cut out the blue scalloped circle. Glue to the centre of the card.

Step 11

Cut out a selection of stars and ribbons and glue around the aperture, snipping if necessary.

Step 12

Add Crystal Drops

You can see how to make the other 2 cards below in my video here 

Buy The Craft Project

]]>
https://www.marksymondsroofing.com/blogs/import-blog-tonic/enchanted-cottage-tutorial 2021-11-02T16:00:12+00:00 2021-11-02T16:00:13+00:00 How To Make Your Very Own Enchanted Cottage With Ruth Hamilton Shopify API

Isn't this little cottage just the cutest! You can make this and some other variations with the Enchanted Cottage Showcase 

Along with the Showcase, you will also need the following Tonic products

- Craft Perfect Card, Bright White 300gsm

- Craft Perfect Texture Weave Card, Chocolate Brown, Chilli Red, Avocado Green

- Craft Perfect Champagne Harlequin Speciality Card

- Nuvo Deluxe Adhesive

- Crystal Drops, Red Berry and Sugared Almond

Step 1

Die cut 2 of the main pieces and 1 square from chocolate brown card.

Step 2

Burnish all the score lines.

Step 3

Use the 2 dies shown together to die cut the door panel.  

Step 4

To make a nice strong base, add a second pentagon inside as shown. 

Step 5

Glue the panels onto the brown die cuts.

Step 6

Die cut a red door using both dies shown together for the detail and the outline die for the backing plate. Glue together.

Step 7

Glue the door in place. 

Step 8

Die cut the 3 dies shown 4 times from Champagne Harlequin card.

Step 9

Glue the two panels together by the side tabs and glue the pieces onto the roof parts.

Step 10

Glue the tabs along the bottom onto the little square die cut.

Step 11

Glue the remaining side together.

Step 12

Fold the tabs over and slip the little protruding parts into the slits.

Step 13

Die cut several pieces of ivy from green card and glue to the cottage

Step 14

Add Crystal Drops to the flowers.

You can see how to make 2 other little cottages on my YouTube channel here - 

Buy The Craft Project

]]>
https://www.marksymondsroofing.com/blogs/import-blog-tonic/homemade-shutter-card-tutorial 2021-10-25T14:03:48+01:00 2024-04-16T16:33:24+01:00 How To Make Your Very Own Shutter Card With Vianney Luna Shopify API

Hello, everyone! Today we will be working with a fun and dynamic stamp and die showcase, the Magic Shutter Card Creator! What I really love about this set is that it will help you make a shutter card super easily from start to finish, and with two different aperture styles and inlay looks. The showcase comes with a stamp set, but today I am only using the dies and simplifying the included instructions a bit. I am only using one card base, where the instructions ask to sandwich the center shutter guard in between two card bases. I will be using three classic card colors: Bright White, Arctic Blue, and French Blue. Simple and clean! Grab your favorite glue and die cutting system, and let’s get started!

Part 1 - Creating the Card Base, Panels and Shutter Pieces!

Step 1

First, cut one card base and one shutter guard from the Arctic Blue card.

Step 2

To cut the guard portion in a way that will center the circle aperture, I will first place all of the dies that can inlay within the guard.

Step 3

Next, I will tape down the inner circle die and the outer guard die

Step 4

Then remove the inlay dies and the rectangular die. Place more tape on the circle and guard die so they will not move. Now run this through your die cutting machine.

Step 5

We will now have our card base and guard properly die cut. Put these pieces aside.

Step 6

Next, I will cut the decorative panels for the front of the card and the shutter guard from Bright White card. I will cut two of the rectangular panel pieces, and will then cut the guard in a similar way that we did for the last portion.

Step 7

To cut the guard piece, go ahead and place all of the inlay dies, tape the inner circle and the outer rectangle. Remove the inlay dies, secure what is left and run through your die cutting machine.

Step 8

You will now have two plain panels and the plain shutter guard. Keep the circle that came out of the guard, also. Place these pieces to the side.

Step 9

We will now cut the decorative inlay panels from French Blue card. Again, two of the rectangular outside panels and one of the shutter guard. We will again cut the shutter aperture as we did before. Placing the inlay dies and circle, however, this time we will choose to keep one of the inlay dies to cut our design.

Step 10

Make sure to tape the rectangular die and inlay die well so they do not shift while die cutting. Again, make sure the dies for the shutter guard are also secured well. Run through your die cutting machine.

Step 12

To cut the other half of the shutter guard inlay decoration, remove the dies and place just the inlay over the portion that still needs to be die cut. Secure well and run through die cutting machine.

Step 13

You will now have two decorative panels and the decorative shutter guard panel. Again, keep the circle that came out of the guard. Set these pieces aside.

Step 14

Lastly, we will die cut the shutter pieces and the sentiment. To do this, I will cut two shutter pieces from Arctic Blue card. I chose to use the slanted shutter die. I will then die cut my chosen sentiment into the French Blue circle that we reserved in the last step.

Step 15

Secure the dies well, and run through your die cutting machine.

Step 16

We now have our shutter pieces and sentiment for the inside of the card.

Step 17

Secure the dies well, and run through your die cutting machine.

Step 18

We now have our shutter pieces and sentiment for the inside of the card.

Part 2 - Putting the card pieces together and assembling the shutter mechanism!

Step 1

Secure the dies well, and run through your die cutting machine.

Step 2

I will go ahead and score my guard piece. Then adhere the basic panel to it, centering the circle cut out area.

Step 3

Now, I will adhere the sentiment to the Bright White circle we reserved earlier.

Step 4

I will go ahead and score my shutter pieces on the score lines.

Step 5

Then I will go ahead and score the Arctic Blue card base on the gatefold score lines.

Step 6

To put the magic shutter card together, I will first focus on the shutter guard. Apply glue on the top tab.

Step 7

Then adhere this tab to the top center of the inside of the card. (This is different from the instructions provided with the showcase set.)

Step 8

I will now bend the shutter guard down so I can see where to place my sentiment.

Step 9

I put glue on the back of my sentiment, making sure to get it very close to the edge. This will assure the shutter pieces will not catch on the edges when opening and closing the card.

Step 10

Place the sentiment, assuring it is centered in the aperture hole.

Step 11

Now lift the shutter guard so we can place the shutter pieces.

Step 12

I placed the shutter pieces over the sentiment. Making sure the pieces are centered and will be center when the guard is in place.

Step 13

Apply glue on both tabs. These will hold on to the panels and will work to open and close once the guard is in place.

Step 14

Go ahead and bring the shutter guard down and close the card. The gatefold panels will now adhere to the shutter pieces. Give it some time to dry before opening, if using a wet glue.

Step 15

Carefully open the card, burnish the folds of the shutter pieces, and adhere the bottom tab of the shutter guard.

Step 16

Apply glue to the bottom panel and turn the tab under so it makes contact with the card base, just like the top tab.

Step 17

You can then burnish all of the scored and glues areas, if you would like. At this point, the shutter is complete!

Part 3 - Creating and assembling the belly band!

Step 1

To create the belly band, I will cut the larger die once and the scalloped circle die from Arctic Blue paper. I will also need one of the larger rectangular decorative panels cut from Bright White, along with two of the shorter rectangular panels, and the background layer of my sentiment.

Step 2

Then, I will cut the decorative layers from French Blue card, again using the inlay dies within the larger and shorter rectangle. We will need one of the larger panels and two of the smaller. I will also cut the sentiment.

Step 3

Then, I will adhere all of the decorative pieces to the basic background pieces

Step 4

Now, I will go ahead and score and fold the belly band die cut. 

Step 5

Next, I will adhere the decorative pieces.

Step 6

I will then fold the belly band and adhere one side over the other. This junction I will place in front and cover it by the sentiment.

Step 7

To complete my sentiment, I placed dimensional adhesives on the back of the sentiment die cut. I will place this on my scalloped circle.

Step 8

I will then adhere this to the belly band junction. Let it dry and slide over your card!


I went ahead and added a paper flower and some pearl stamens.

Our card is done! I am so impressed with how quickly a card of this type comes together with this showcase set. I love the mix and match of the Verso dies, the design options are endless!! Thank you for spending time with me. Have fun!!

Buy The Craft Project

]]>
https://www.marksymondsroofing.com/blogs/import-blog-tonic/paper-craft-a-warm-cup-of-love 2021-10-07T16:00:04+01:00 2021-10-07T16:00:05+01:00 Paper craft a warm cup of love with Ruth Hamilton Shopify API

The Coffee Collection Showcase is a beautiful set of dies and stamps which can be used to make cards or other crafty projects for coffee lovers!

You can make tall coffee cups or mugs or a gorgeous little coffee cup. There are also dies to add cream, sugar cubes, mallows and coffee beans. You can even add a little steam!

I’ve used lots of different items from the Harvest Moon Trend to make this card as I thought they worked together so well.

To make today's card, you will need the following:

  • Craft Perfect Bright White 6x6 card blank
  • Craft Perfect Baroque Satin Effect Mirror Card
  • Craft Perfect Royal Garnet Speciality Paper
  • Craft Perfect Harvest Moon 6x6 paper pad
  • Craft Perfect Bright White Smooth Card
  • Craft Perfect Sugar Crystal Glitter Card
  • Craft Perfect Ballet Pink Texture Weave Card

  • Craft Perfect Silver Mirror Card
  • Craft Perfect Coffee Cream Pearlised Card
  • Craft Tacky Glue
  • Double sided tape
  • 3D foam pads
  • Die cutting machine

Step 1

Layer a 13cm x 13cm piece of Royal Garnet paper onto a14cm x 14cm piece of Baroque Rose card and attach to the card front with double sided tape. 

Step 2

Die cut the tall coffee cup and handle from Baroque Rose card and cut out the top of the cup. Reserve this piece to glue back in.

Step 3

Die cut the inner coffee cup shape from glitter card. Use both the outer and inner dies for the pattern on the top and bottom with Coffee Cream card and cut out the centre plain die from the paper pad. Use the die shown on the right to cut out a paper heart.

Glue all these pieces onto the coffee cup on the card.

Step 4

Die cut the outer “cream” shape twice from white card and use the inner detail die on one of the pieces. Glue the pieces together and glue to the coffee cup.

Die cut some pink and white mallows.

Step 5

Attach the mallows with 3D foam pads. Die cut a spoon from silver mirror card and glue at the bottom right of the coffee cup.

Step 6

Die cut several hearts from different papers and card and glue around the outside of the coffee cup. 

You can see how to make 2 more cards on my YouTube channel here 

Buy The Craft Project

]]>
https://www.marksymondsroofing.com/blogs/import-blog-tonic/happy-little-christmas-tree 2021-09-09T16:01:39+01:00 2024-04-16T16:29:50+01:00 Happy Little Christmas Tree Card With Kate Haynes Shopify API

Hey fellow craft lovers. As we enter into the glorious autumn season, it is also time for some of us to be properly thinking about the next season ahead and (dare I say it)... if you’ve not already started, do some Christmas crafting! Here is a little inspiration for you, using the newly released Tonic Showcase: Happy Holiday Set; which comes with a die & stamp set as well as a stencil. I have found it super fun and very versatile to play with.

To make this festive card, you will need the following:

  • Showcase: Happy Holiday Christmas Tree Stamp & Die Set
  • Santa’s Workshop Diamond Hybrid Ink Pads
  • Nuvo Embellishment Mousse - Seaspray Green & Myrtle Green
  • Nuvo Expanding Mousse - Worn Linen & Bramley Apple
  • Craft Perfect Kraft Card
  • Craft perfect 7x7” Bright White Card Blanks
  • Craft Perfect Foam Pads
  • marksymondsroofing Magnetic Crafter’s Platform
  • Nuvo Blending Daubers
  • Nuvo Precision Blender Brushes
  • Nuvo Media Spatula
  • Washi tape
  • Tonic Tangerine Die Cutting Machine
  • Heat tool
  • White gel pen

Step 1

Cut x2 7x7” squares from kraft card. On one of the squares, position the tree outline die slightly over towards the left-hand-side, secure into place with tape and cut to create a tree stencil (negative) and tree cutout (positive).

Step 2

Position the square with the tree stencil directly over the top of the second kraft square and secure into place. TIP: The Tonic magnetic crafter’s mat is ideal for this.

Step 3

Using a blending dauber, apply the ‘Shamrock Green’ Nuvo Hybrid Ink through the tree stencil. Let’s call this Tree 1.

Step 4

Remove the tree stencil, take the tree cut out piece and secure it directly over the top of Tree 1. Using the white pigment ink and a blending dauber, create a ‘misty’ effect around the tree edge.

Step 5

Remove the tree cut out and re-position as shown. Continue the misty effect around to create a second tree, blending into the first with the pigment ink.

Step 6

Take your stencil that comes with the Happy Holiday set and using some washi tape, cover the immediate gaps surrounding the tree; including the tree’s trunk.

Step 7

First, reposition the cut tree shape stencil back over the top of Tree 1 and then position & secure the stencil you have just adapted over the top.

Step 8

Using a spatula, apply the ‘Bramley Apple’ Nuvo Expanding Mousse through the stencil and then heat-set with a heat tool to fluff it up.

Step 9

With a white gel pen, add some ‘snow’ definition to the tree edges.

Step 10

Die cut a second ‘tree’ shape (Tree 2) and apply the ‘Myrtle Green’ Embellishment Mousse first, adding some depth with the ‘Seaspray Green’ afterwards. Set aside to dry.

Step 9

Remove the washi tape from the stencil and align the ‘snow waves’ over the top of Tree 2. Secure into place and apply ‘Worn Linen’ Expanding Mousse. Heat set and then do one final ‘long’ line along the bottom section of the tree.

Step 10

Using the stencil, add random ‘snow dots’ with the Worn Linen expanding mousse and heat-set each group of three, before applying the next three. Fill any gaps with single dots until you are happy with your ‘snowfall’ look.

Step 9

Trim the edges of your square base by approximately 3mm on each edge and attach to a 7x7” white card blank.

Step 10

Using foam fixers, attach Tree 2 directly over the top of the second ‘misty’ tree outline.

Step 9

Stamp the ‘Merry Christmas’ sentiment onto kraft cardstock in the ‘Glacier Cherry’ red hybrid ink and cut out using the above die shape. Using a white gel pen, hand draw a little border around the edges if desired.

Step 10

Attach the sentiment using foam pads and there you have your finished festive card!

I love getting messy and playing around with combining different Nuvo. I hope this has inspired you to have a play with bits you may already have in your crafty stash or to try something new.

Thank you so much for reading my post and happy crafting!

Kate x

Buy The Craft Project

]]>
https://www.marksymondsroofing.com/blogs/import-blog-tonic/timeless-tea-jar-lolly-geter 2021-08-19T15:55:02+01:00 2021-08-19T16:19:35+01:00 Hand made Tea Jar With a Vintage Style With Lolly Geter Shopify API

What you will need

  • Timeless Tea Jar Die set
  • Buttermilk Yellow Craft Perfect card stock
  • Pistachio Green Craft Perfect card stock
  • Ivory Craft Perfect card stock
  • Nuvo Deluxe Adhesive
  • Baker’s twine, about 6 inches
  • Shank button
  • Grosgrain ribbon (optional)

Step 1

In Buttermilk Yellow card stock, cut two of the smaller sized main dies, one jar octagonal bottom, one upper rim (by cutting one octagonal bottom with a smaller octagonal die inside), and four of the small lid lip sections.

Step 2

In Pistachio Green, cut two of the lid sections and four plain octagonal pieces.

In Ivory, cut four leafy decorative octagons, four leafy trapezoid pieces (small ones with slanted sides), and four leafy triangles.

Step 3

Glue the white decorative octagons to the solid green octagons, and glue those to the four large centers in the main jar pieces. Glue the small ivory triangles & trapezoids to the matching sections on the lid pieces, and glue the two lid pieces together in the centers.

Step 4

Burnish all scored edges on the main die pieces and begin folding in, gluing as you go.

Step 5

Glue the ring across the top tabs. Glue the lip piece flaps to the underside of that ring, one at a time, adhering each to the previous lip piece.

Glue the bottom piece in place.

Step 6

Using a hole punch, punch two holes side by side in the center of the lid top. This hole might need to be enlarged with a craft blade and made just large enough for the shank of a button to fit snuggly into it. Glue the lid flaps together.

Step 7

Cut one tag in Pistachio and one decorative section in Ivory. Glue together and attach baker’s twine to the tag and to the button shank. Add a drop of permanent glue to the shank of the button and push it into the hole in the top of the lid.

Step 8

Glue grosgrain ribbon across the base of the jar lid.

Buy The Craft Project

]]>
https://www.marksymondsroofing.com/blogs/import-blog-tonic/showcase-9-tutorial 2021-06-22T16:13:21+01:00 2024-04-16T16:22:34+01:00 Showcase 9 - Fanciful Florals Die Set With Dawny P Cameron McCann

Hello crafty friends – Dawny P here and welcome to the craft room and this month’s showcase collection. This month our showcase is a beautiful and ultra-versatile set called Fanciful Floral Frames.


This set allows you to create lots of different frames for your cards and projects, as well as layering and there is also a lovely set of banner dies which you can use on its own or with the set of stamps that come with the set – more of that in a sec!!


So, there’s 23 dies here which can make up 25 different types of frame – that’s amazing!! They’re a good size as well. You can use the dies end to end or mix and match with others in the set. And as they’re verso dies, you can leave them in your card if you choose for even more versatility. There’s a beautiful floral theme with these which make them perfect for practically any occasion as well. And included within the set are 10 debossed sentiments.


As I just mentioned, there’s a set of sentiment stamps as well – 17 sentiments plus a dashed banner which works really well with the dies, plus 4 cute little accessory stamps – a tiny flower, a heart, a star and a flourish – and I like using these to create borders or for adding little points of interest The thing that grabbed me about the stamps when I first saw them is their lovely fonts, and there are two different ones. They’re also, for me, a really nice size as well.


So, what are we making today? Well, I thought we’d use some of the dies to make nice layer and then add a frame and a sweet banner sentiment to create a nice pretty card.


What you’ll need 

What you’ll need 

  • marksymondsroofing Fanciful Floral Frames Showcase die and stamp set
  • Tonic Tangerine die cutting machine
  • Tim Holtz - Stamping Platform
  • Craft Perfect Classic Cardstock - Mauve Purple
  • Craft Perfect Classic Cardstock – Bright White
  • Craft Perfect - 6x6 Paper Packs - Dream In Colour
  • Nuvo - Crystal Drops Gloss - Crushed Grape
  • Nuvo - Ink Pad - Black Shadow
  • Nuvo Deluxe Adhesive
  • Craft Perfect Adhesive Foam Pads
  • White organza ribbon
  • Pencil and rubber
  • 8x8 white card blank

Let’s do the prep first, starting with the frame

Step 1

OK so firstly place the die on a piece of Mauve cardstock and with the pencil, mark the two little grooves where the two black dots are shown. Take the die off of the card then draw vertical line over them down either side. This will help you line up the dies when we come to the next bit. Replace the die onto the card and run it through the machine.

Step 2

Now place the die back onto the card at the other end, lining those little grooves on the lines you drew (how big a gap you leave is up to you) and re-run back through the machine

Step 3

So it should now look like this. What you need to do now is cut from A and A and B to B to release the frame from the cardstock. You’re basically joining up the die cuts with your scissors.

NB Don’t cut along your pencil lines – your cut lines are just outside of these.

Step 4

It should look like this. Now rub out the pencil lines and your frame is done.

Now let’s finish the cutting.


Step 5

Cut 5 of this shape from Bright White cardstock.

Step 6

For the banner, cut one of the larger shape in white and one of the smaller size in purple as shown.

Step 7

Take your stamp set and stamp out the dashed lined banner shape, as shown, onto a scrap of white cardstock.

Step 8

Now stamp your sentiment into the centre of the stamped banner.

Step 9

And finally cut it out using the die shown here. 

Step 10

Last bit of prep – cut your card and patterned paper to these sizes –

White – 166mm square

Mauve – 170mm square

Patterned paper – 154mm square

That’s the prep all done and now we can put this all together.

Step 1

Mat the white square onto the mauve square using glue or DST.

Stick onto your card base using dimensional pads.

Step 2

Now stick down the patterned paper square as shown. 

Step 3

Take 2 of the white die cuts and the frame you made and stick together as shown ie right sides of the white die cuts to the wrong side of the frame.


I used glue – take care not to get it onto the bits of the white card that will stick out over the edge of the frame. I added a strip of DST across the join as well, but you don’t really need to do this if you don’t want to.

NB – l’ve done this so that the flatter part of the white die cuts are hanging over the edges of the frame but you can do this with the curved end for a different look.

Step 4

Now take another 2 of the white die cuts and glue them on top of the first pieces as shown.


I stuck this down so that the curved ends of the white die cuts hang over the edges of the frame this time, but again you can glue it the other way if you want. It looks nice either way.

Step 5

Now using dimensional pads, stick down to the front of your card base.

Step 6

Take the last remaining white die cut and stick down to the front of your card as shown. Again, I used dimension pads but you can stick it down flat if you’d prefer. 

Step 7

Now for the banner. Glue the smaller mauve die cut pieces onto the larger white piece. Don’t forget the little bits at either end!!

Step 8

Using dimensional pads, add the stamped sentiment piece. 

Step 9

Add this to the card front as shown. 

Step 10

Finally, add a bow and finish off with some beautiful Nuvo Drops. 

Buy The Craft Project

]]>
https://www.marksymondsroofing.com/blogs/import-blog-tonic/showcase-8-tutorial 2021-05-18T16:01:09+01:00 2024-04-16T16:20:06+01:00 Showcase 8 - Luxurious Lantern Die Set With Dawny P Shopify API

Hello crafty friends – Dawny P here and welcome to the craft room and this month’s showcase collection. This month our showcase is this fabulous Luxurious Lantern die set. These dies create a really substantial project which can be used as a gift box or if you use the inside edge dies, you can cut into the base shape and pop in some battery tea lights to make a beautiful lantern. The finished project is just over 7” tall and is really easy to put together.

What you will need

What you will need

  • marksymondsroofing Luxurious Lantern die set
  • Tonic Tangerine die cutting machine
  • Craft Perfect Classic Cardstock - Arctic Blue
  • Craft Perfect Classic Cardstock - Mauve Purple
  • Craft Perfect Classic Cardstock – Bright White
  • Precision Glide Folder
  • Nuvo Deluxe Adhesive
  • Strong double sided tape
  • Craft Perfect Adhesive Foam Pads
  • Baker’s twine or ribbon

There are 22 dies in this set which includes 8 embossed sentiments and as always, you can use the decorative elements on your cards and other projects. There’s also a nice tag and you can mix and match the sentiments and pop them on it – there’s 2 little spaces all ready made for them. You can also shorten or lengthen the actual base shape and I’ve shortened this on one of my projects. I’ll touch on how to do this in my video so keep an eye out for that. I think it’s a stunning set of dies with lots of scope for different uses.


Now onto the project and what we are going to make today? I thought it’d be nice to make a gift box. This will hold quite a bit and I’m going to make a few of these for Christmas.


So let’s get started.

So let’s get our cutting done first. This is what you’ll need to cut -

Step 1

Cut 2 of the base pieces in Mauve Purple.

Step 2

Cut 4 of this shape in Arctic Blue. You have a choice whether to use the plain edge or the edge with the pinhole detail.

Step 3

Cut 4 of this shape in Arctic Blue.

Step 4

Cut 4 using the outside edge pieces in Bright White then use the inside edge die to cut in the detail.

Step 5

Cut 4 of this shape in Arctic Blue. Again you have a choice whether to use the plain edge or the edge with the pinhole detail.

Step 6

Cut 2 of the tags in Mauve Purple. I always cut 2 and then glue them together so it looks nice and neat on both sides – you’ll see in a second.

Step 7

Cut 1 in Arctic Blue. 

Step 8

Cut your sentiments. You’ll need 2 and you have a choice as there are 8 different ones. I went for ‘Birthday’ and ‘Wishes’. I just ran these through the machine without using embossing plates and you can see that the detail really stands out. Once done, I trimmed them down.

So that’s our cutting done – now let’s go onto to preparation and assembly.

Step 1

Apply strong tape to the side glue tabs as shown. Do this for both base pieces. You can use wet glue if you want but I find this is a better option.

Step 2

Now flip it over and apply strong tape to the bottom tabs as shown. Again do this for both pieces. Then reinforce your creases. For the curved sections, I find it easier to bend them around my hand. I also crease all sections apart from the base in both directions as I find this helps with assembly later on. 

Step 3

It’ll look a bit like this.

Step 4

Stick the white detail pieces onto the blue outside edge pieces. Because these are going to be stick onto a slight curve later, use your hand or bone folder to gently bend them slightly.

Step 5

Now remove the backing from the tape on the side glue tabs on one of the base pieces, line up and stick together as shown. It might be helpful if you add a little bit of wet glue over the tape so that you can move it if it’s not quite in place. 

Step 6

Now stick your panels on as shown. You’ll see that we’ve only stuck 3 down at this point – we’ll add the rest once we’ve joined the sides. 

Step 7

And speaking of which!

Now remove the backing from the tape on the other side glue tabs and bring that side around to meet the other side to stick the box together


Step 8

Now stick on the remaining panels. I’ve tucked the base out of the way here and we are going to sort that out in the next step. 

Step 9

There’s a couple of ways you can deal with the base but I’ve found this is the easiest way. Open the top up and rest it face down like this so that it’s upside down. Then bend in one of the bigger sections. 

Step 10

Now remove the backing tape and stick down the smaller sections. You might want to put your hand inside the box to press them down well. 

Step 11

Now apply glue to the remaining larger section and stick down. Doing it this way, the base looks nice and neat when you look inside. 

Step 12

Just the tag to do now.

Stick both main tag pieces together, wrong sides facing.

Step 13

Now stick down the blue decorative piece – I used foam pads to add dimension but you can stick it flat if you don’t want to use these. 

Step 14

Now stick down your trimmed sentiment pieces. Then thread some twine or ribbon through the top.

Step 15

Finally, bend the top sections inwards and the decorative scalloped flaps outwards then thread some twine or ribbon through the holes and pull together. Tie off then attach the tag.


Buy the Craft Project

]]>
https://www.marksymondsroofing.com/blogs/import-blog-tonic/showcase-7-tutorial 2021-04-08T15:55:00+01:00 2024-04-16T16:16:57+01:00 Showcase 7 - Exquisite Envelopes With Dawny P Shopify API Join Dawny P in this helpful tutorial where she shows you how to create marksymondsroofing latest Showcase Die set

More

]]>

Hello crafters – Dawny P here and welcome to the craft room and this month’s showcase collection. This month our showcase is the gorgeous Exquisite Envelope set of dies which make sweet gift tag holders for you. And not one, but two different designs. You can also use the elements on your cards and other projects.

So what we are going to make today? I thought it would be nice to make a holder and a matching card set, which includes a bit of stencilling as well. We’ll start with the gift tag holder then move to the card.

What you’ll need 

What you’ll need 

marksymondsroofing Exquisite Envelope die set
Tonic Tangerine die cutting machine
Craft Perfect Classic Cardstock - Arctic Blue 
Craft Perfect Classic Cardstock – Bright White 
Nuvo Jewel Drops – Limoncello
Buttercup Haze sequins from Sweet Sorbet Pure Sheen pack
Sunrise Yellow and Borrowed Light ink pads and applicator
marksymondsroofing Magnetic Platform
White card base cut to 126mm x 138mm – top or tent fold
Some bits of scrap white cardstock approx 280gxm
Nuvo Deluxe Adhesive
Craft Perfect Adhesive Foam Pads
Strong double sided tape
Small scrap of white ribbon
 So let’s make a start.

Everything you'll need to cut

Step 1

Cut one of this die in Arctic Blue.

Step 2

Cut one of this die in Bright White.

Step 3

And cut one of this die in Bright White.

If you are making a matching card, then you’ll need to cut 2 of these.

Step 4

Now let’s make our stencils.

Take your piece of white cardstock and cut one each of these inside edge dies. Depending on your machine, you might have to run it through twice, especially if your cardstock is a bit heavy. I used 300gsm with my Tangerine and it cut beautifully as you can see.

Time to get your inks out

Step 1

Take a piece of Bright White cardstock and on the smooth side, apply the Sunrise Yellow and Borrowed Light inks randomly. 

Step 2

Trim a narrow strip of the inked card and stick it down onto a slightly bigger strip of white card.

Step 3

Now while you have your inks out, place the stencil you made onto another piece of white cardstock and apply the ink.

If you have a Magnetic Platform, it will be your best friend here. Once done, use the outside edge die and cut it out.

Step 4

Repeat for this shape.

Step 5

And also for this shape.

Step 6

Now take your stencilled piece here and glue it to the shape you cut out in step 2.

Lets Assemble

Step 1

Now let’s assemble.

You will need to reinforce the crease lines on the main piece. I’ve left them here so that the piece lies nice and flat for the photo, but now’s a good time to do this.

Once done, glue your stencilled pieces down. Then trim the narrow strip and glue down.

Step 2

Now add some strips of strong double sided tape to the back of this piece. If you want to this as a little pocket, don’t put any on the top section. If you don’t then you can glue all over.

Step 3

Now tie on a small bit of ribbon then stick down to the middle section. Make sure the top – the bit with the hole – is facing the right way.

I won’t tell you how I know this. I also cannot find the red faced emoji!!

Step 4

Add some red liner tape to the little tabs in the middle section and also the side glue tabs. Or you can use wet glue if you’d prefer.

Step 5

Remove the backing tape from the little tabs and bend them in and stick down as shown here.

Or apply glue and do the same if you’re using wet glue.

Step 6

Remove the backing tape from the side glue tabs (or add your wet glue) and stick down as shown.

Step 7

Fold over the top and tuck the front flap into the slit as shown.

Step 8

Glue down your buckle die cut then add some sequins and Jewel Drops

Now For a Card

Step 1

Take a piece of scrap card and using the stencil we made above, randomly apply Borrowed Light ink. 

Step 2

Now repeat with the Sunrise Yellow.,

You can cross over the colours and you’ll get a pretty green colour where the inks meet, as I did for the main picture above, or you can leave a bit of space as I’ve done here. No rights or wrongs here – just do what makes your eyes happy.

Step 3

Now trim to 75mm x 126mm

Step 4

Cut two narrow strips of Arctic Blue cardstock to approx 12mm and cut a ‘v’ in one end.

Step 5

Thread through the buckle shape and bend the top bit over a bit.

Step 6

Now hook over the stencilled bit of card and tape down on the back.

Step 7

Stick to front of card.

Step 8

Add a sentiment – I used the ‘With Love’ from the Luggage Tag set but you could stamp one if you’d prefer.

Then finish off with some sequins and Jewel Drops.

Buy The Craft Project

]]>
https://www.marksymondsroofing.com/blogs/import-blog-tonic/a-dozen-colouring-techniques-with-dawn-p 2021-03-26T15:45:01+00:00 2021-03-26T15:45:01+00:00 A Dozen Colouring Techniques with Dawny P Cameron McCann

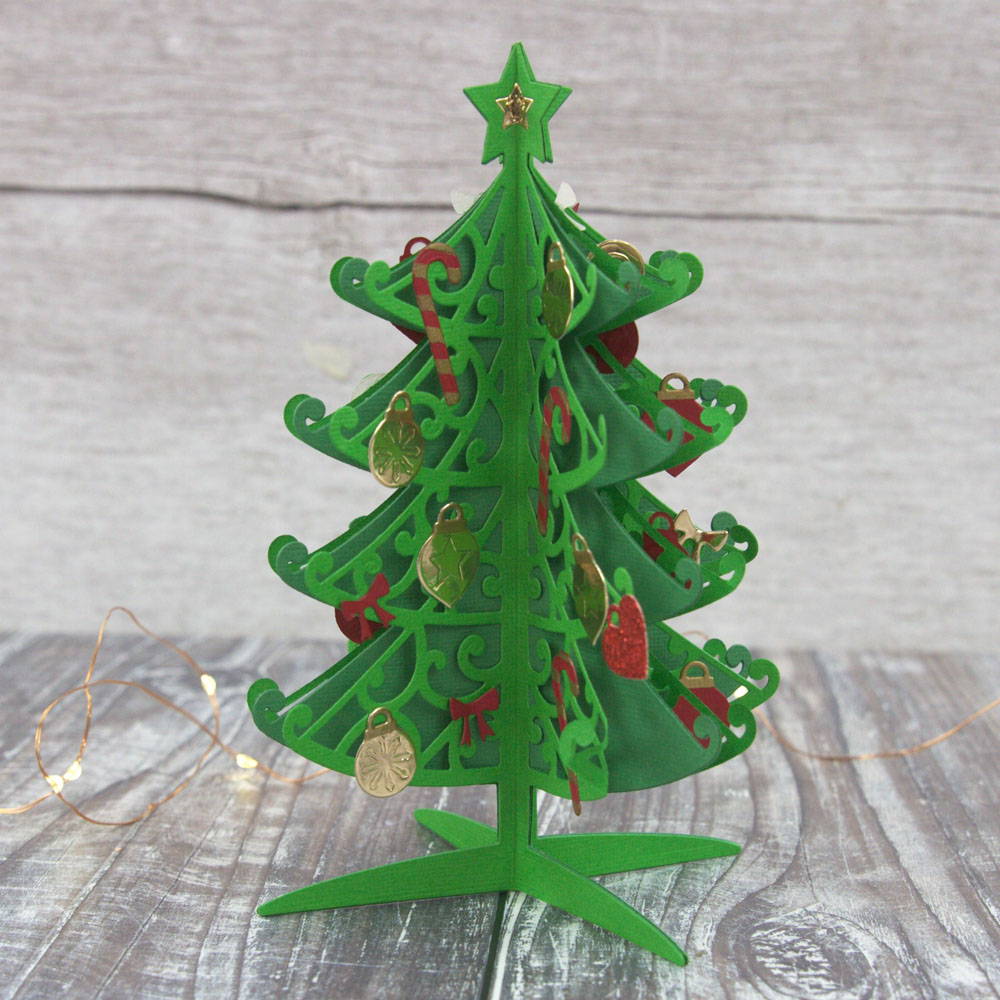
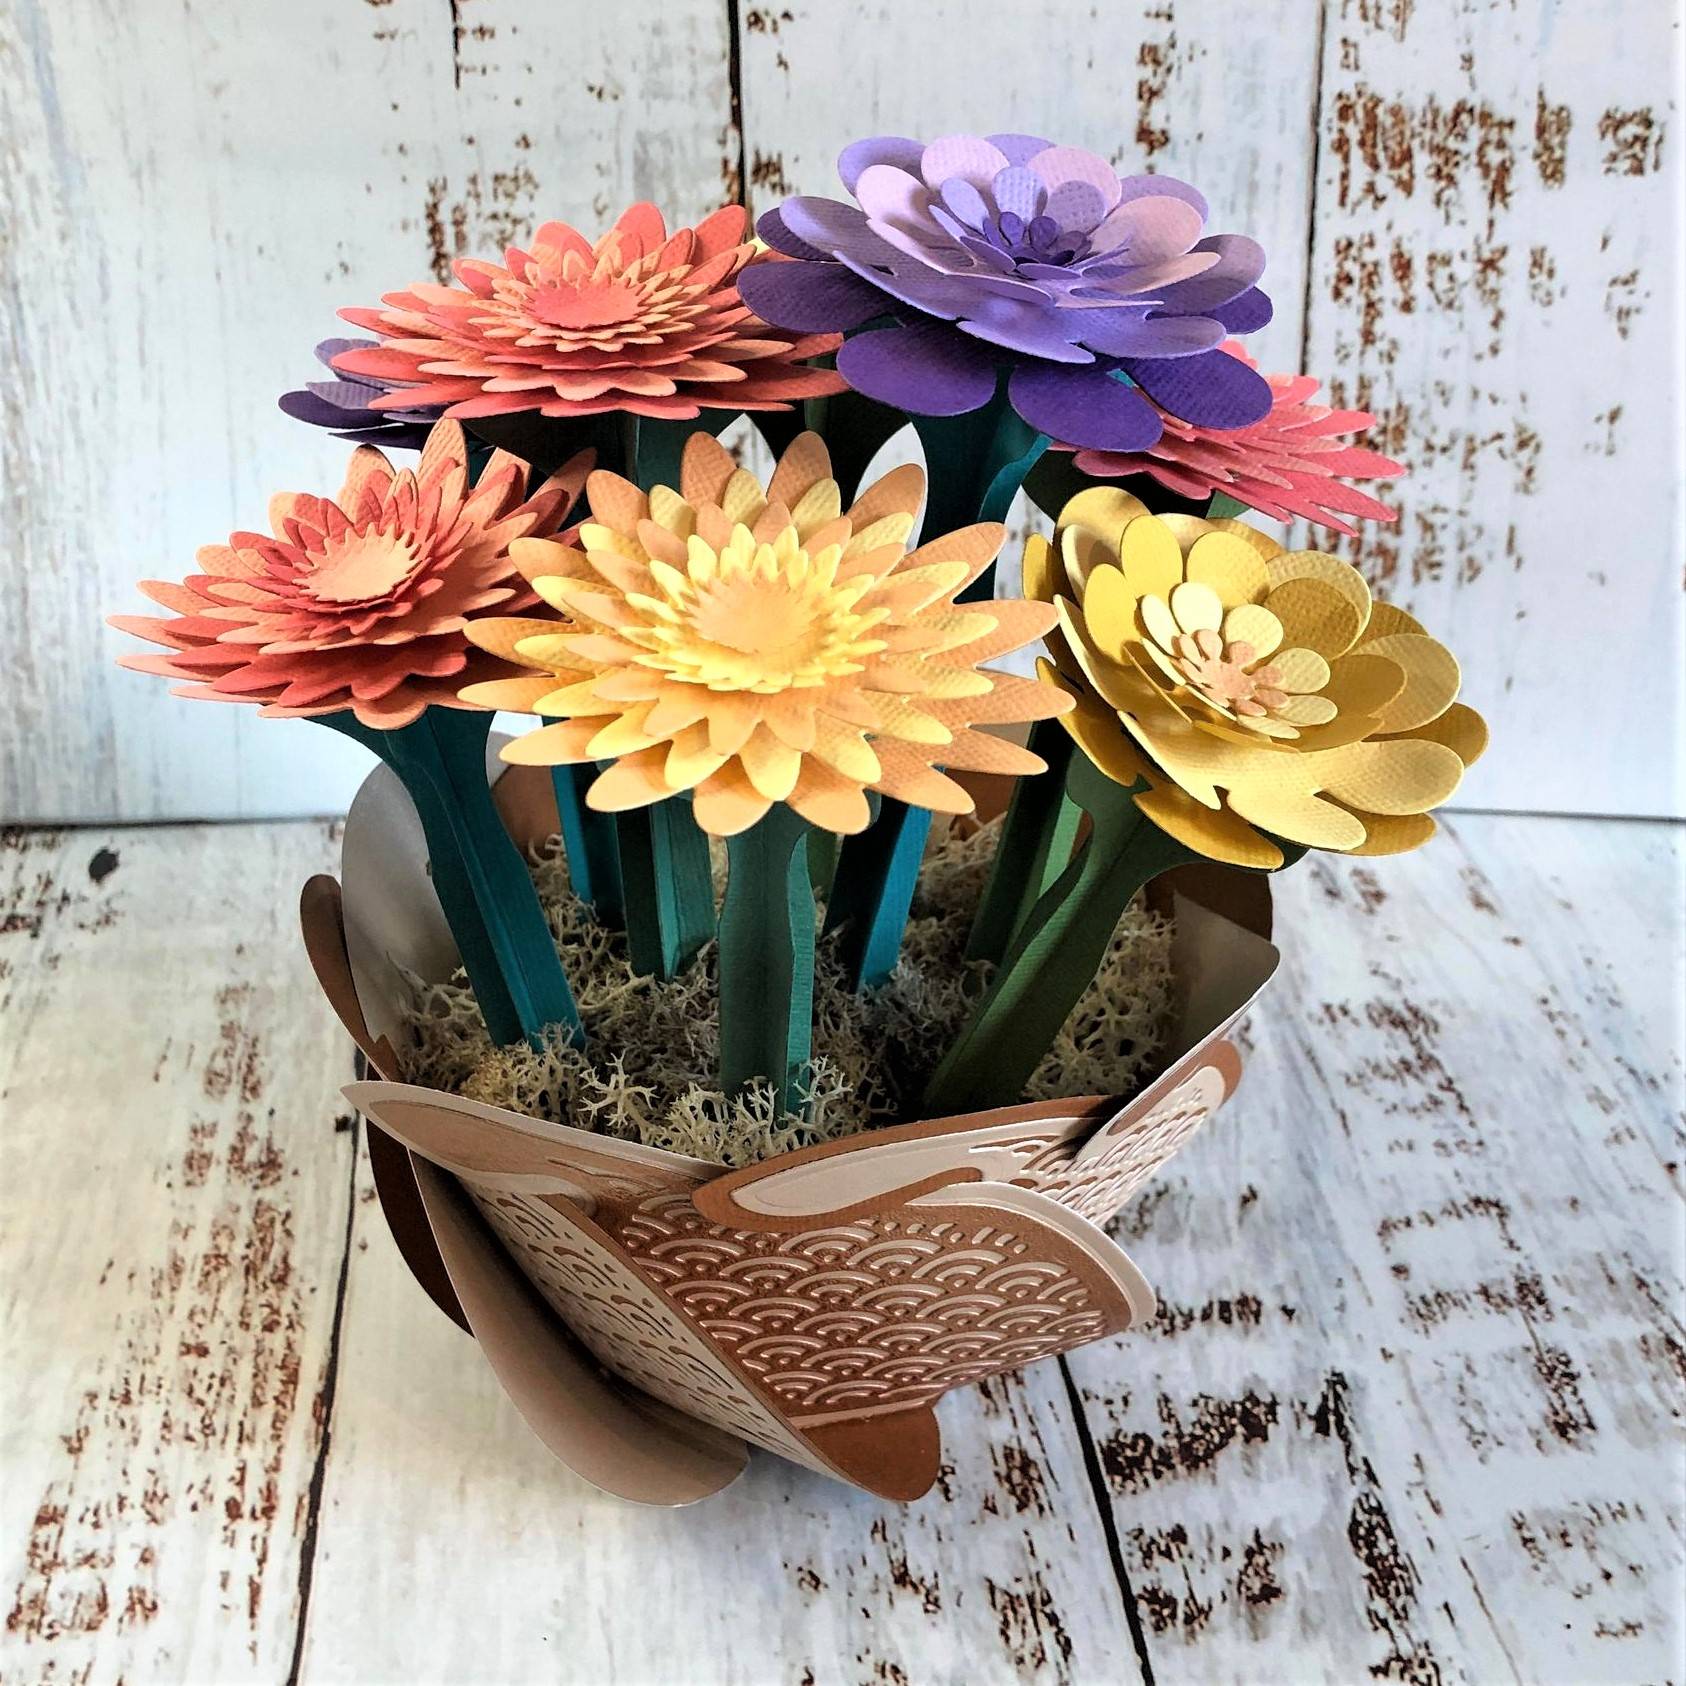
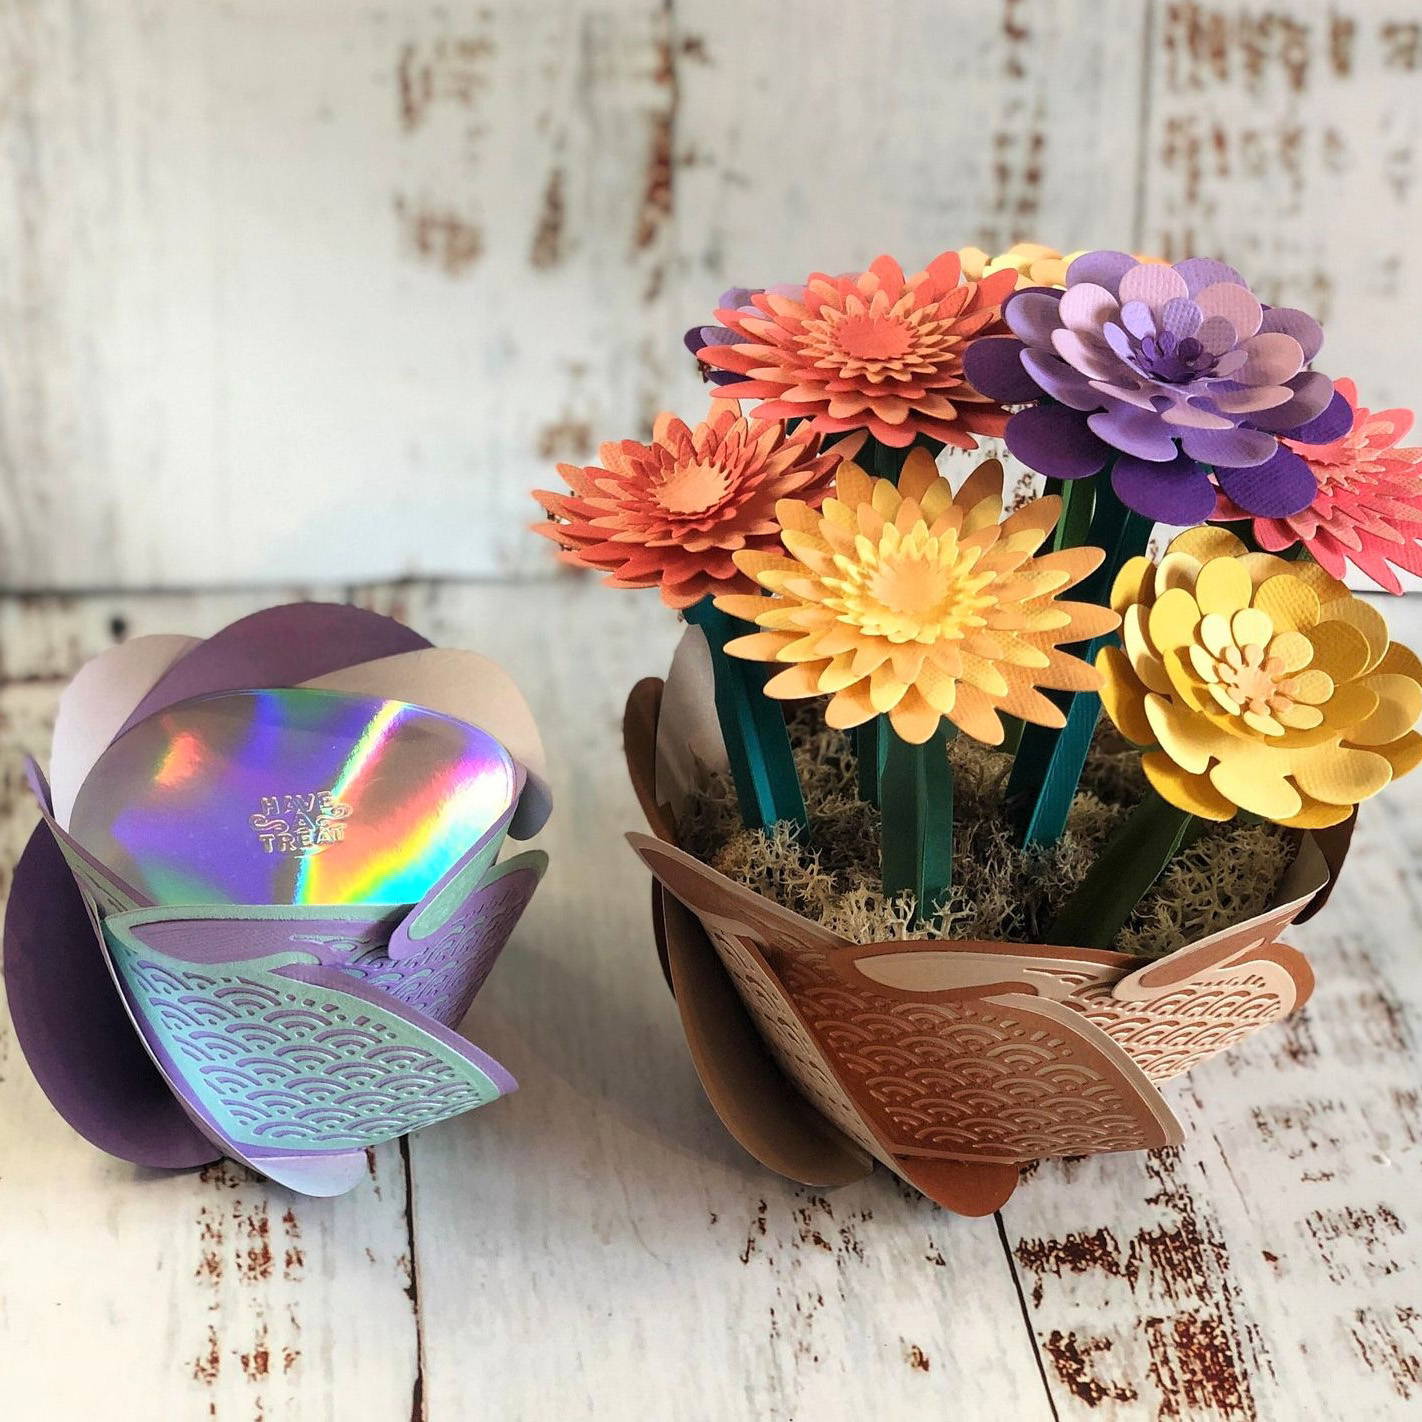
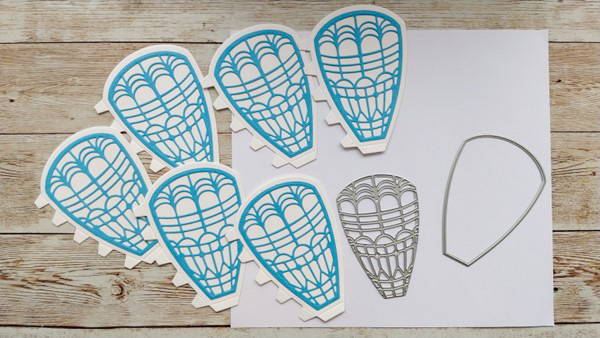
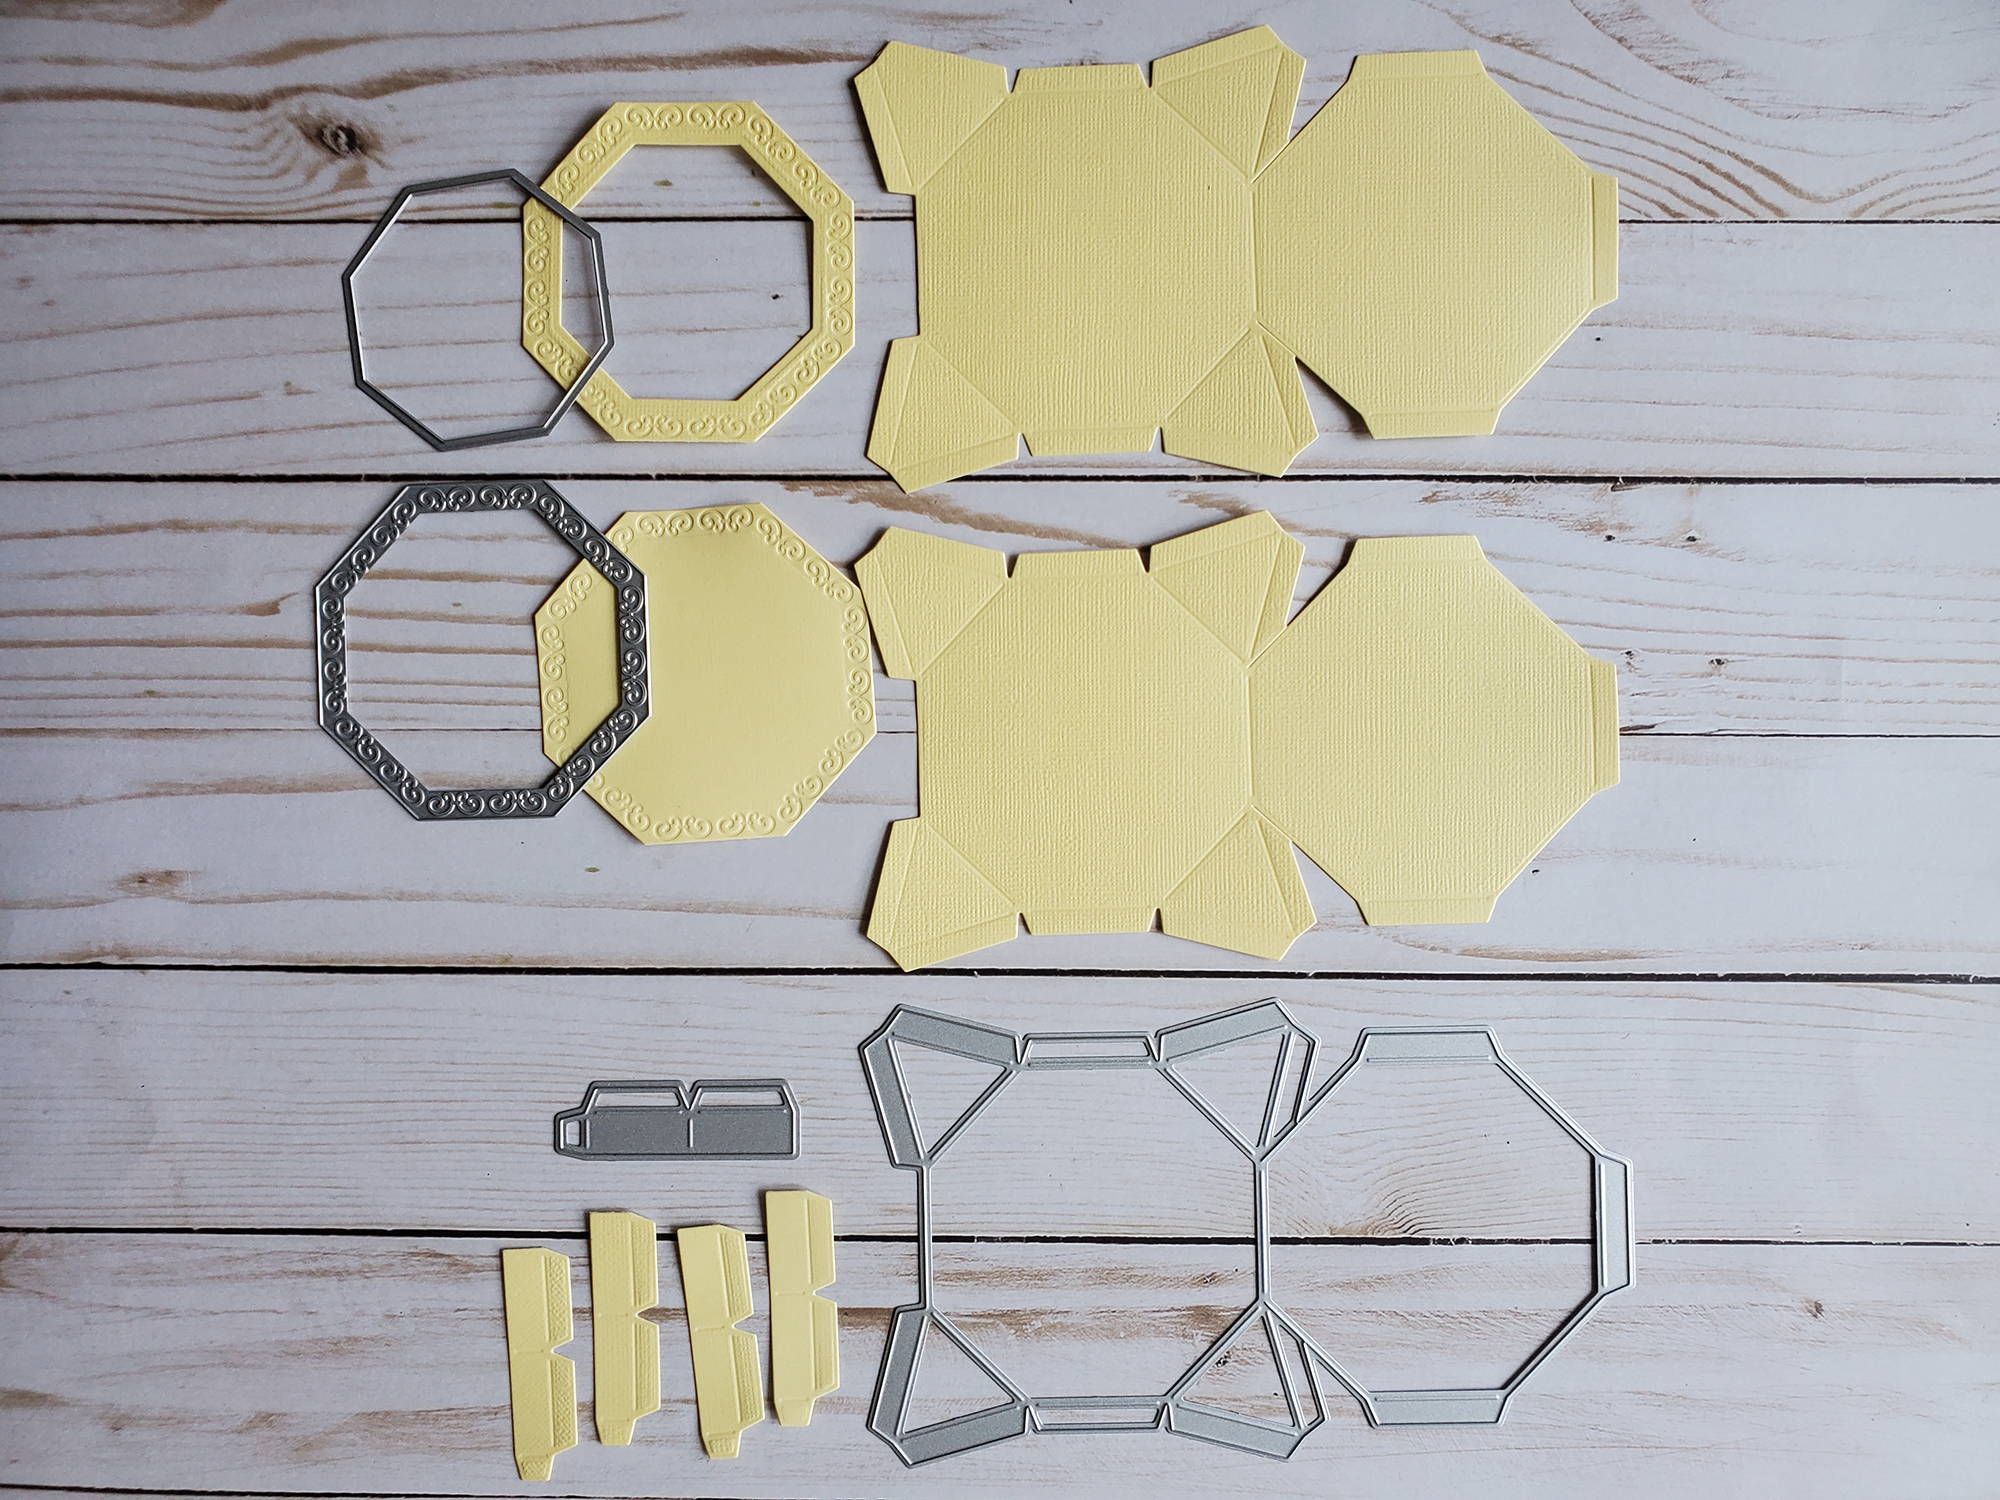
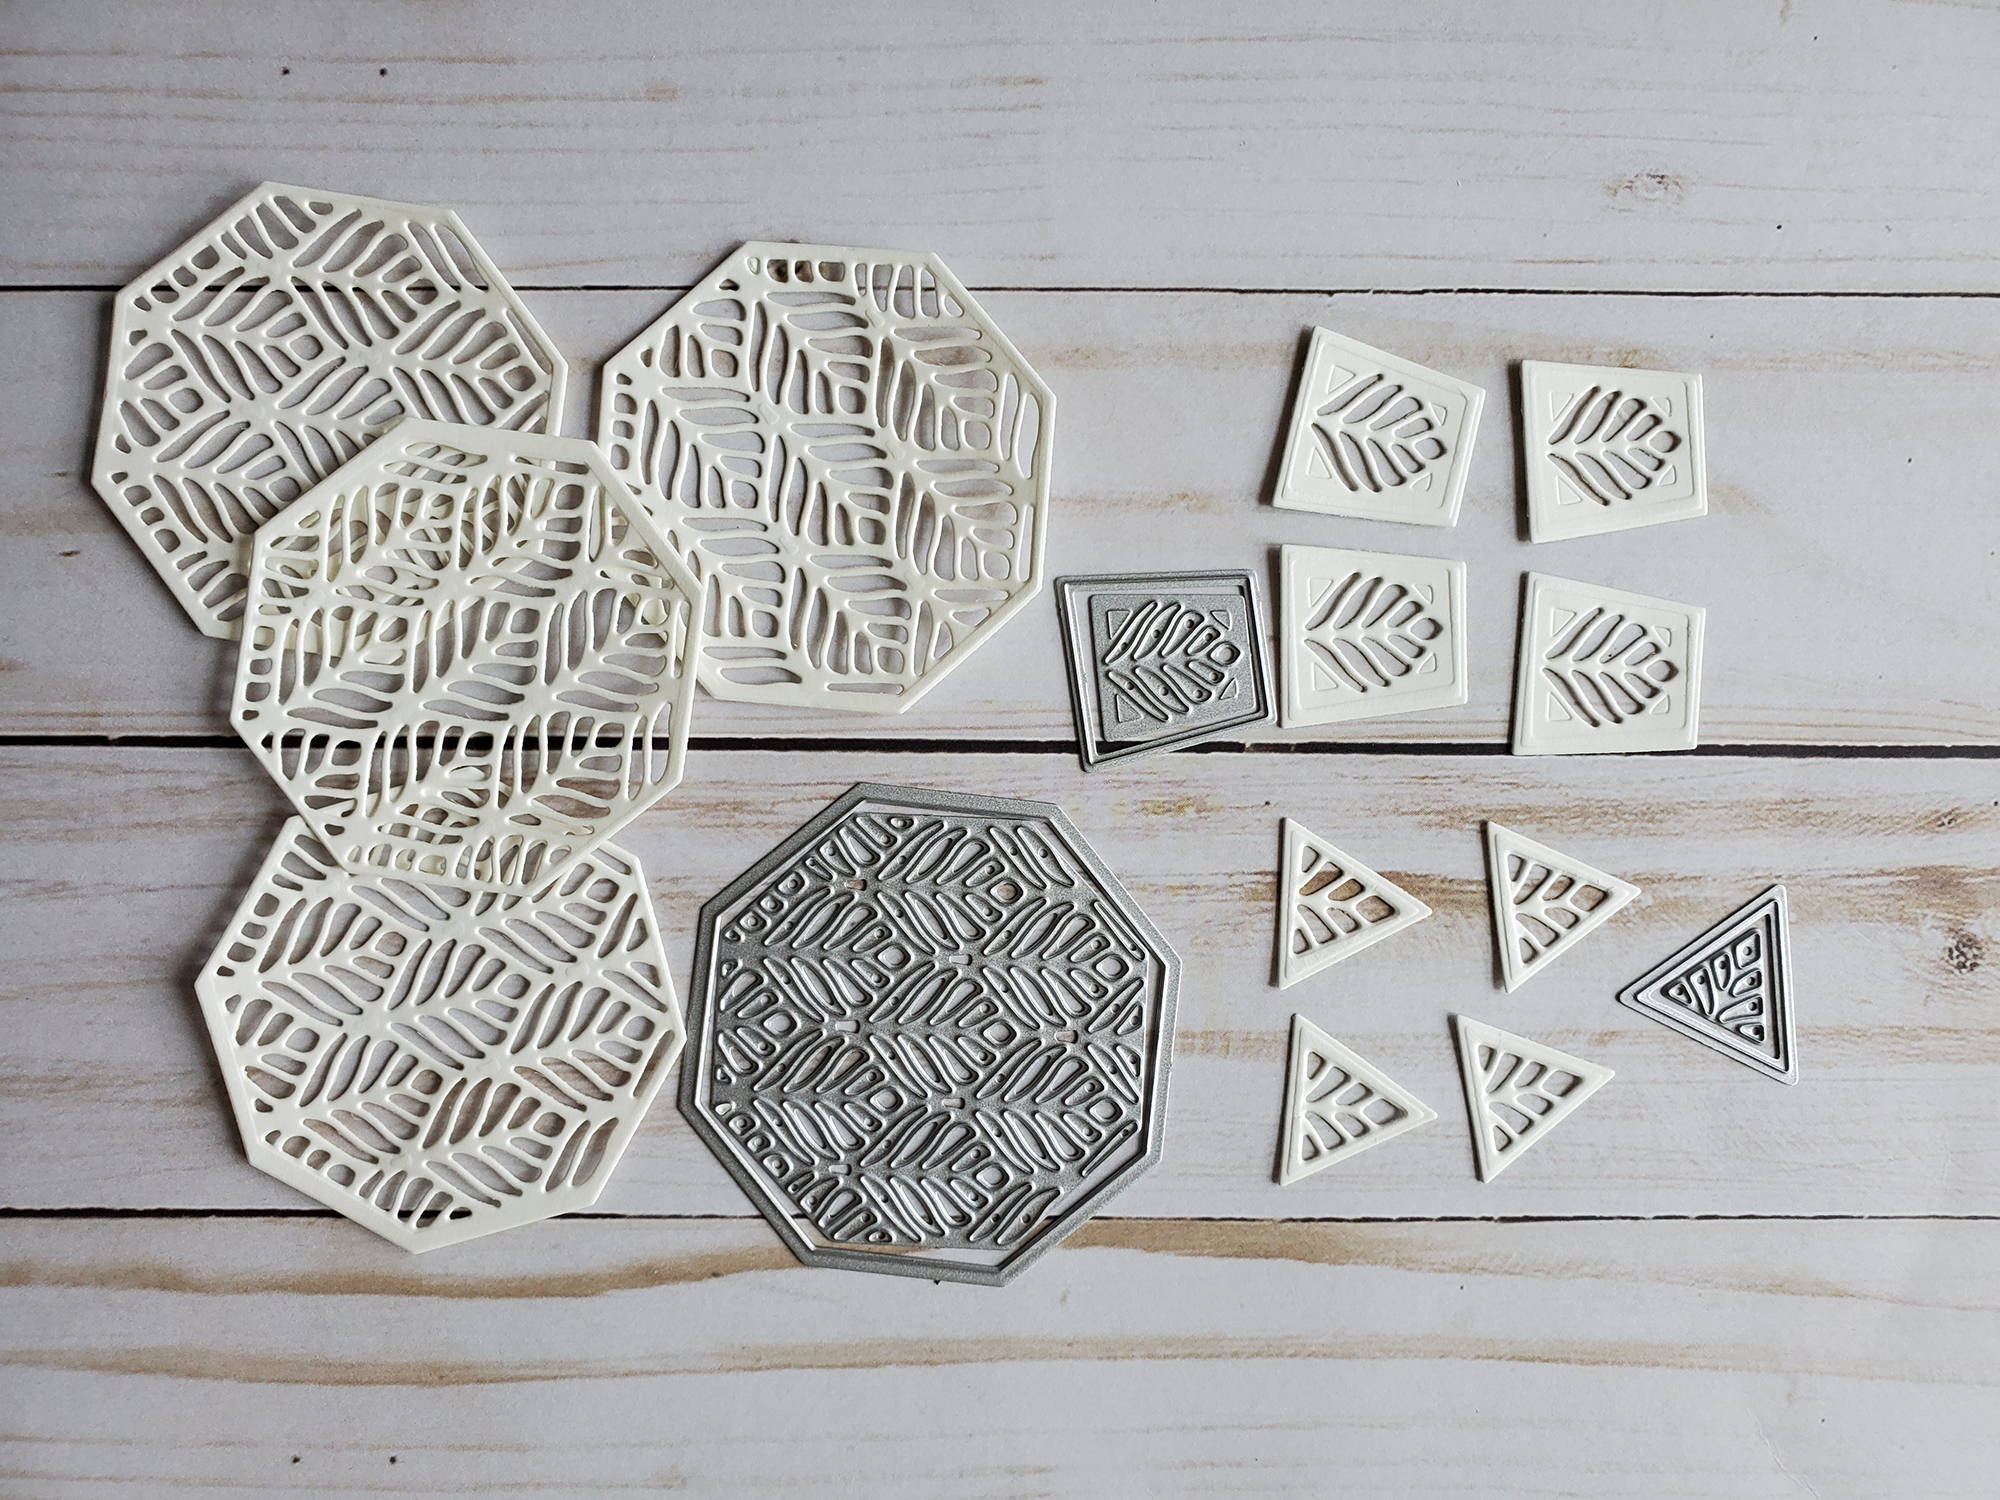
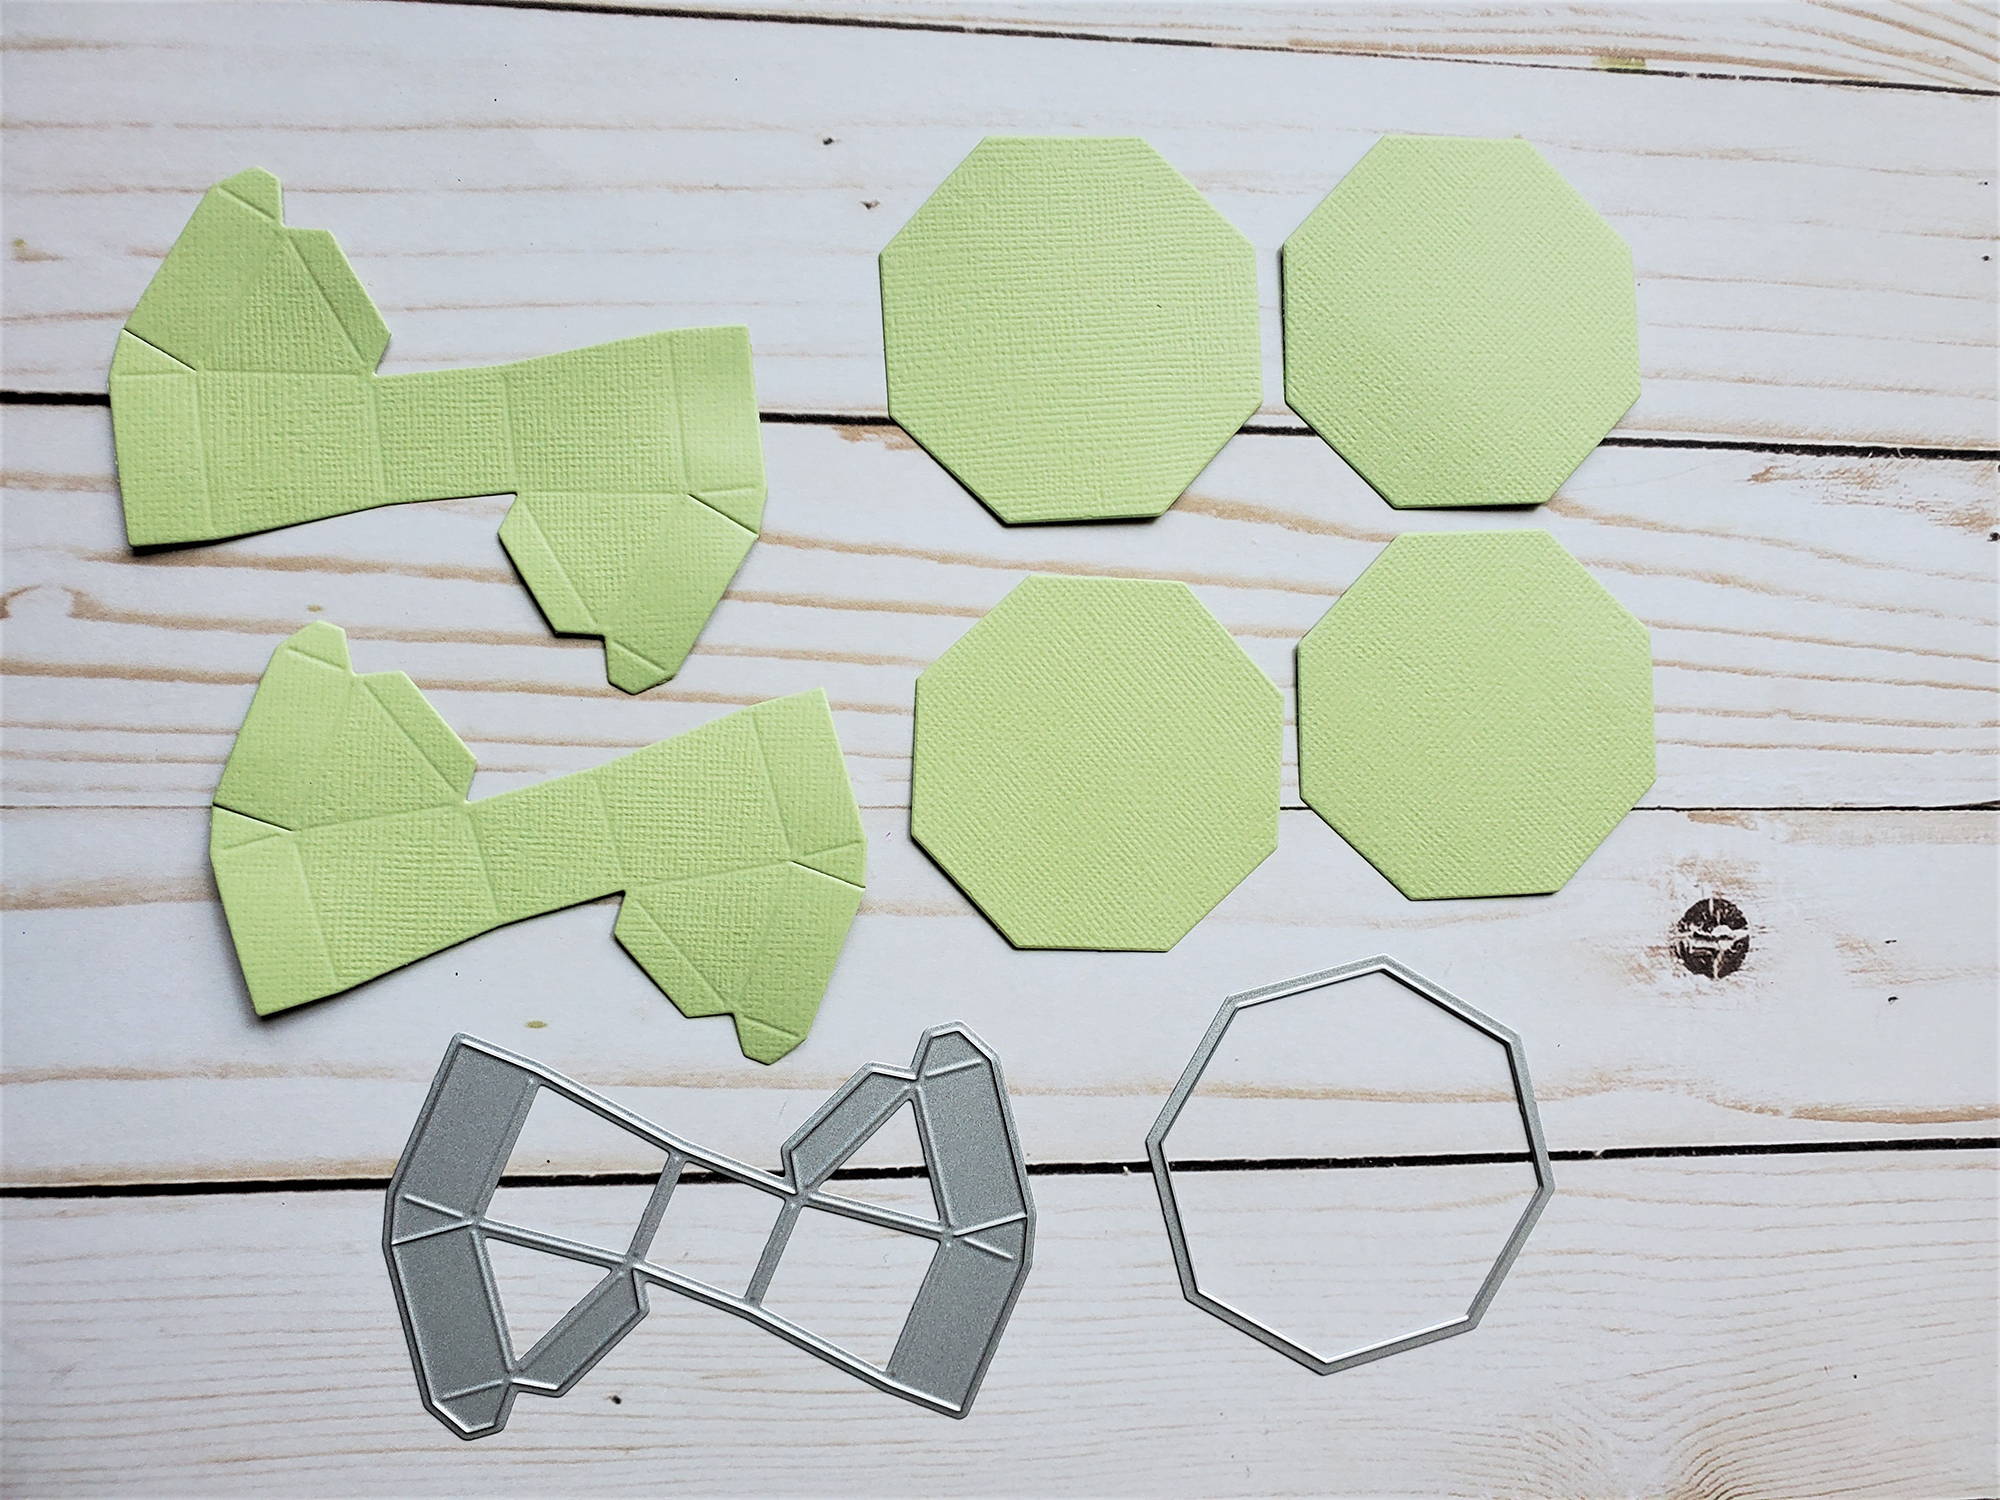
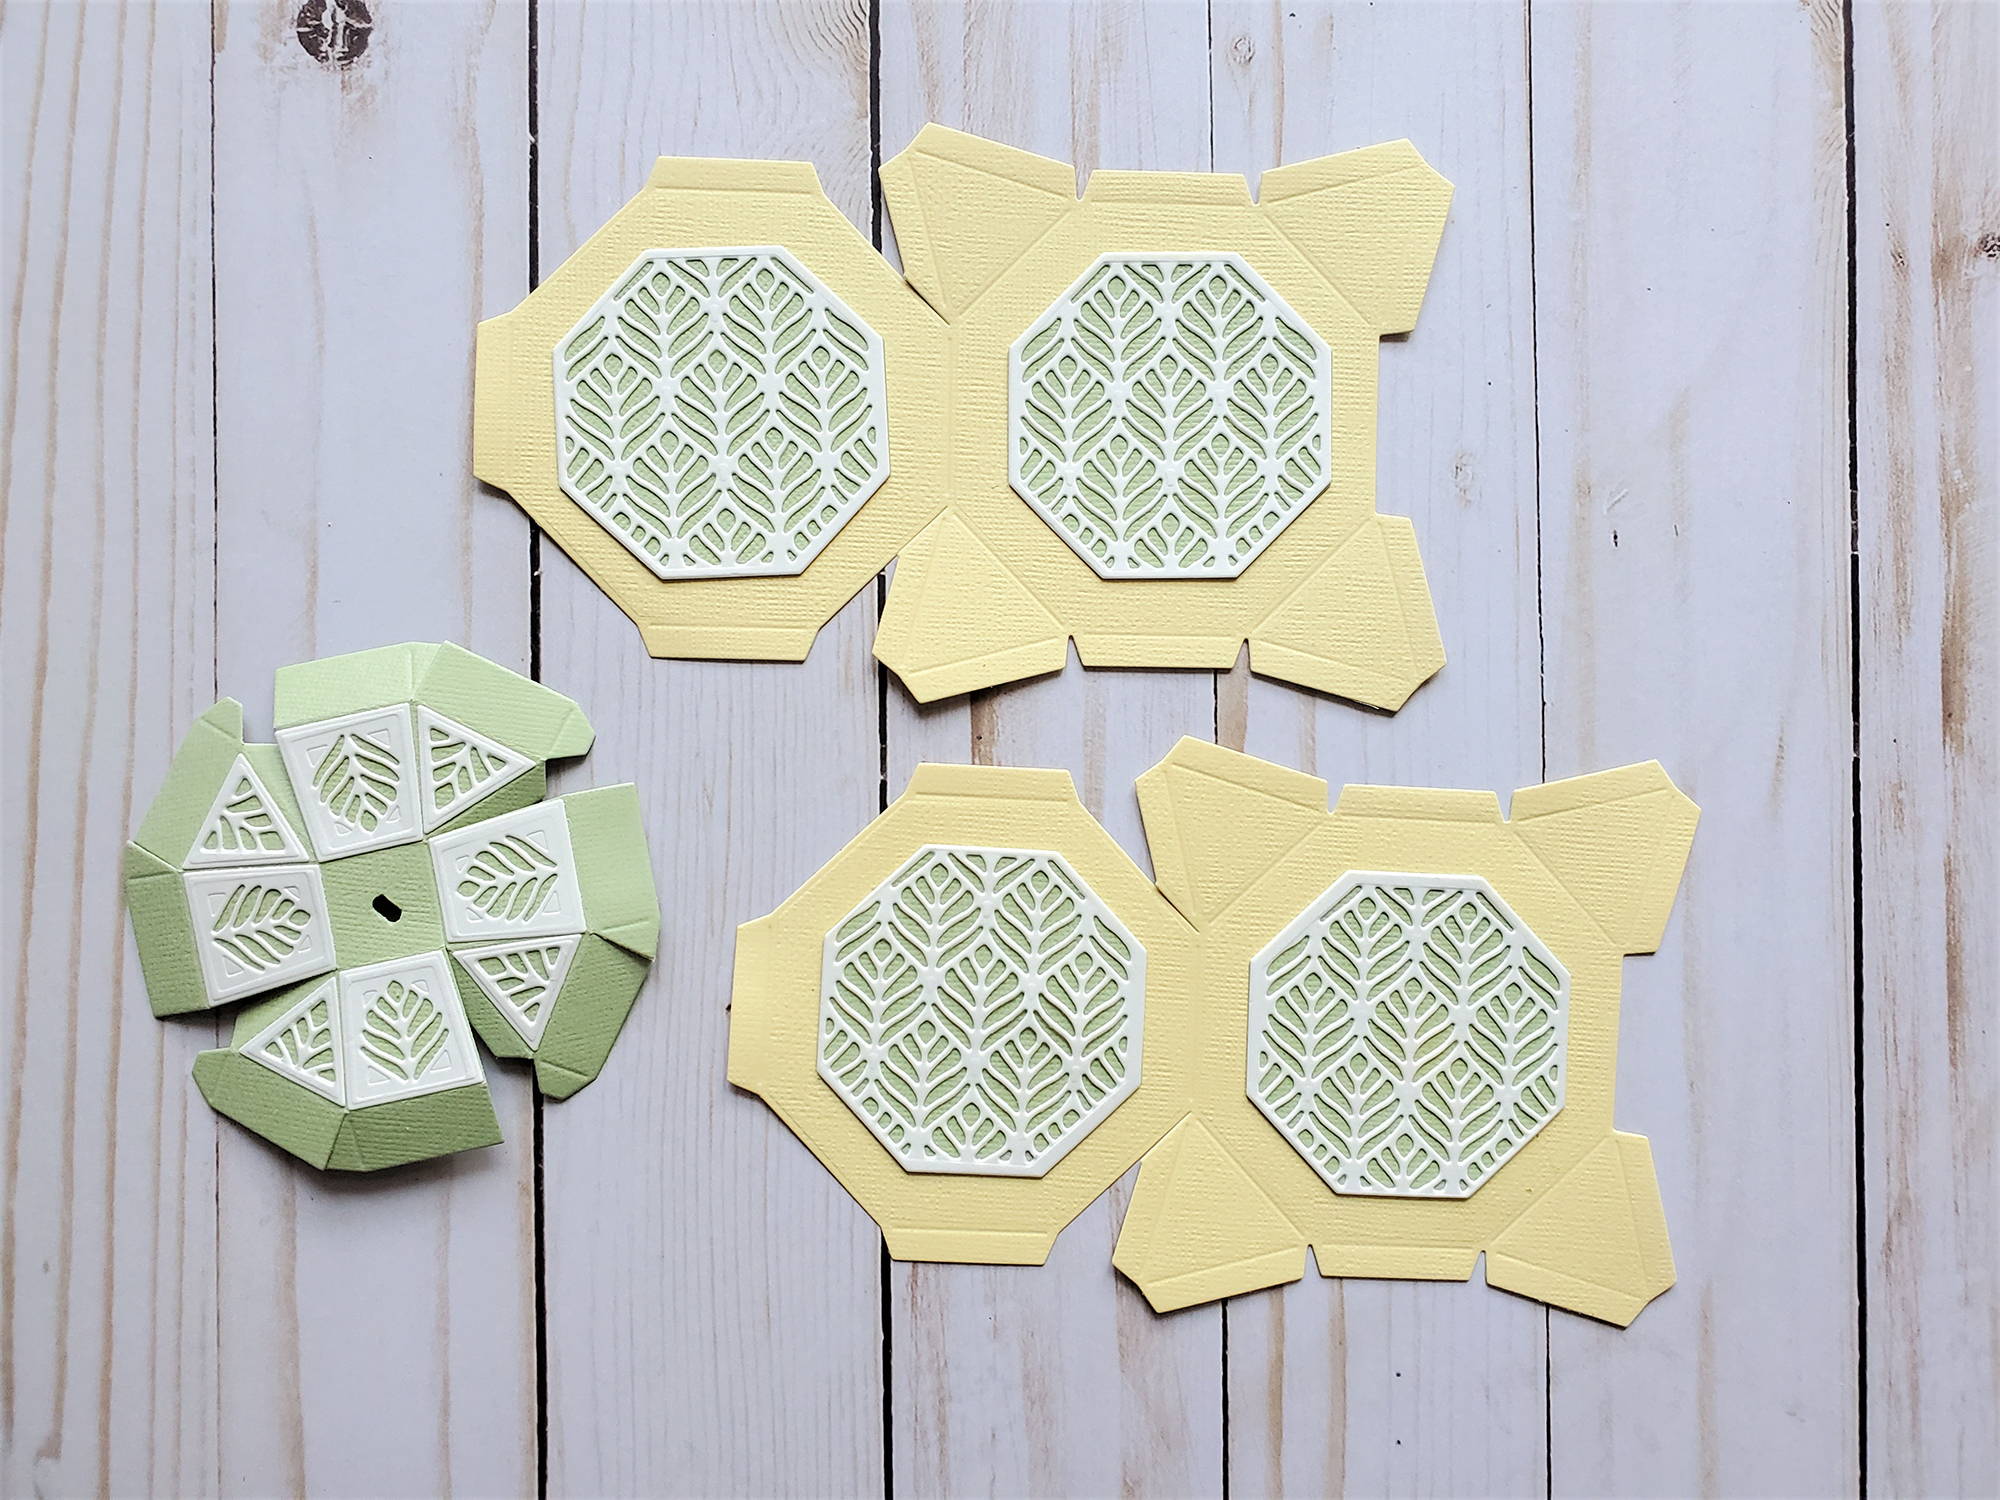
Hello crafters – Dawny P here and welcome to the craft room. Remember the saying ‘go to work on an egg’? If you don’t then you are probably a LOT younger than me. But I literally did just that here, and in this step by step we are going to explore some of the different techniques you can use to decorate the gorgeous little eggs from the Egg-cellent Easter Die set.

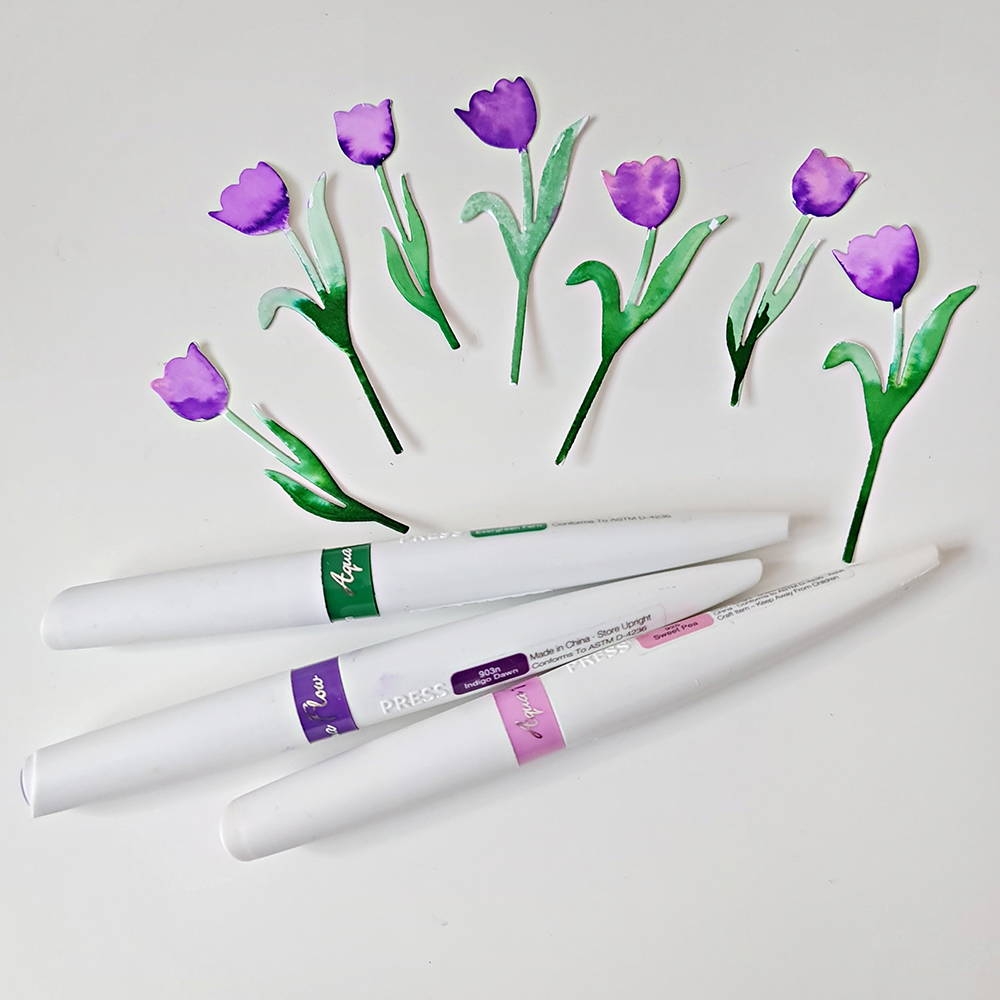
Decorating eggs for Easter is a tradition that dates back to at least the 13th century, but we are going to bring it right up to date by using the Nuvo Alcohol Marker pens. But these techniques can be carried over into your other craft projects as well, so they are for life and not just for Easter!! And our pens aren’t just for colouring images either

OK so let’s have a look at our dozen eggs.

Simple but not so plain

Colour used

473 – Sweet Vanilla

So this really shows how these pens work. They layer colour and the more ink you lay down, the darker the colour and effect will be.

Here, I just coloured the egg in and then I went back over the lower sections, over and over again, going further down the egg each time so that the colour really built up.

I think this is a pretty good colour for an egg.

Ombre

Colours used

451- Pink Lady, 452 - Pink Taffy & 454 -Dragon Fruit

Who doesn’t love a bit of ombre!.

Here. I started at the bottom of the egg and coloured about a third of the way up using Dragon Fruit. I then carried on using Pink Lady, but going into the first colour a little bit on the way.

Finally, I did the same thing using Pink Taffy. Once that was done, I used this lightest shade to go over the egg once to bring it all together.

Simple Stripes

Colour used

363 – Tropical Ocean

Easy peasy to do but it looks fab I think. I just took a piece of spare card and laid it across another piece of white card. Then using the chisel end of the pen, I just used the edge of the spare card as a guide and drew lines.

I die cut the egg out after I drew the lines because the end of the stripes look neater this way. I also used card that was a bit porous here so there is the teeny tiniest amount of bleed.

Mad for Plaid

Colours used

452 - Pink Taffy & 454 - Dragon Fruit

Such a nice effect here I think. Using the chisel end of Dragon Fruit, I simply drew vertical lines onto a scrap of card, then went across them horizontally. Then using Pink Taffy and the bullet tip, I drew across the thicker lines. It’s dead easy to do and you’ll get a different effect by drawing the lines closer together.  

Once again, I die cut the egg out after I drew the lines.

Over-Laid

Colours used

391 – Butternut Squash and 393 – Spiced Orange

Here, I used the pens to colour the background for the egg, but I randomly added the colours and I wasn’t too particular about smoothing out the lines.

The sharp eyed amongst you will see that there is texture to the card I used. It’s just linen card and I used it because some of ink will settle in the little grooves – very subtly though. The I cut the inside edge of the die and glued it over the top.

All That Glitters

Colours used

393 – Spiced Orange and 405 – Indian Saffron

Here, I stuck double sided tape across some card. I varied the width of tape and I left gaps in between the tape. Next, I coloured the gaps using the chisel end of the pens, then I removed the backing tape and added glitter. Then I die cut the egg shape.

Randomly Sparkling

Colour used

436 – Wild Iris

Here, I stuck narrow double sided tape randomly across the die cut egg. Then I added the colour before removing the backing tape and adding glitter. I like this effect. You could take it one step further and draw little zentangle patterns over the coloured areas.

Alcohol + Alcohol = Fabulous

Colours used

405 – Indian Saffron, 416 – Vine Leaf, 428 – Blueprint, 436 – Wild Iris and 454 Dragon Fruit

Oh I LOVE how this turned out.

So I die cut the inside and outside edges in white card. Then I placed the inside edge on top of the outside edge but didn’t glue it down. I then randomly coloured in between the detail on the die cut. I didn’t think too much about what colours I was using or where they were going.

Then I took the inside edge away and because the card is a bit porous, the ink had bled. It looked really nice – a bit fuzzy and that’s another effect in its own right. But I then dripped rubbing alcohol over the ink and all the colours sort of melded together.

And I was quite smitten!! This would look fab if you heat embossed it with clear powder.

Waste Not Want Not

Colours used

405 – Indian Saffron, 416 – Vine Leaf, 428 – Blueprint, 436 – Wild Iris and 454 Dragon Fruit

So after doing egg #8, I was left with an inside edge die cut which I very nearly threw away.

But then I remembered that I am a crafter and we don’t throw anything away do we!!

So I cut another outside edge out and glued them together. It’s very hippy-esque I think, not to mention a happy accident.

Or should that be a hippy accident (oooh sorry)!!

Just WOW

Colours used

391 – Butternut Squash, 393 – Spiced Orange and 405 Indian Saffron

I think this is stunning. Oooh those colours ….

Anyway, I kind of did an ombre effect with the pens, going darkest at the top. Then I got a pipette and added little drops of rubbing alcohol over it. It’s like magic watching the pattern appearing.

This would make a fantastic background with so much interest that you would only really need a sentiment and you’d have a lovely card.

I’m so going to try this.

All Flannel

Colour used

436 – Wild Iris

So many things you can do with these pens and alcohol, and here’s another one. I just coloured the die cut then dipped an old flannel into some rubbing alcohol and dabbed it over the egg.

If you are coloured an animal eg a bear, you could use this technique to create a furry look. Using different textured fabric, such as denim, you will get some lovely effects.

Full Circle

Colour used

363 – Tropical Ocean

Last one for now – I’m sure there’ll be more at some point.

So again the egg was coloured and then I got a clean blending dauber, dipped that into the rubbing alcohol and then pressed it lightly onto the card. If you used more alcohol and left it on the card longer, you’d get a much stronger effect.

]]>
https://www.marksymondsroofing.com/blogs/import-blog-tonic/showcase-6-tutorial 2021-03-18T15:45:00+00:00 2021-04-08T11:33:47+01:00 Showcase With Christine Smith Shopify API Join Christine Smith in this helpful tutorial where she shows you how to create marksymondsroofing latest Showcase Die set

More

]]>

This page content is generated by GemPages.
For more information, please visit: https://www.marksymondsroofing.com/gempage

Edit this page with GemPages

]]>
https://www.marksymondsroofing.com/blogs/import-blog-tonic/showcase-5-tutorial 2021-02-16T16:01:05+00:00 2021-02-16T16:01:06+00:00 Showcase 5 - Picnic Box With Ruth Hamilton Cameron McCann

Tonic's latest Showcase die set, Picnic Season Gift Box is so cute! It does actually look like a little hamper and I could just imagine heading off into the sunshine with it full of treats.

I have created a few different ideas with this set as you can see if you visit my YouTube video, but in this example I am showing you how to assemble the pieces and how the different pieces go together.

To make this little box you will need

  • Showcase Picnic Box Die Set
  • Craft Perfect Kraft card
  • White card
  • Pistachio Green card
  • Butermilk Crystal Drops
  • Nuvo Deluxe Adhesive
  • Rustic Rose 6x6 paper pad

How to make it

Step 1

Cut out 2 of the main gift box pieces in kraft card.

Step 2

Die cut 2 patterned panels for the sides of the box. Using the 2 dies shown create panels for the front and back from white card.

Step 3

Glue these pieces onto the kraft gift box sides.

Step 4

Glue the bases together and add glue along the side tabs.

Step 5

Attach the tabs to the inside edges of the box.

Step 6

Die cut the lid from kraft card and the decorative panels from white card using both dies shown.

Step 7

Glue the decorative pieces onto the lid and add glue onto the tabs on ONE side only.

Step 8

Attach the glued tabs to the inside edges of the box at the back, leaving the front open.

Step 9

Die cut the plain handle from kraft card and the decorative handle from white card. Glue these together and glue to the tabs at each side of the lid.

Step 10

Die cut the tag pieces as shown, from kraft, green and white card and layer together. Cut out 4 leaf sprigs and using both dies shown, die cut 2 white flowers.

Step 11

Attach the flowers and leaves to both sides and add Crystal Drops.

Step 12

Attach the tag to the handle with twine and add extra Crystal Drops to the flowers on the white panels.

]]>